
The Workspace ONE Tunnel solution provides a secure access to your work apps and corporate resources from a wide variety of devices (iOS, Android, Windows, macOS and Linux). This capability is included with the Mobile and Desktop Essentials licenses, which makes it a cost effective option for all organisations. No expensive VPN services!
The Tunnel can provide either Per-App or Full Device VPN capabilities and encrypted traffic is terminated securely on a company perimeter using the Unified Access Gateway (UAG) virtual appliance.
Tunnel provides industry-best security and builds on TLS 1.3 libraries, implements SSL Pinning to ensure no MITM attacks, and includes client certificates on the allowlist to ensure identity integrity. While the default is to use the AirWatch CA, you can also opt to use a third-party CA for client authentication by uploading the full chain of the public key of your certificate authority.
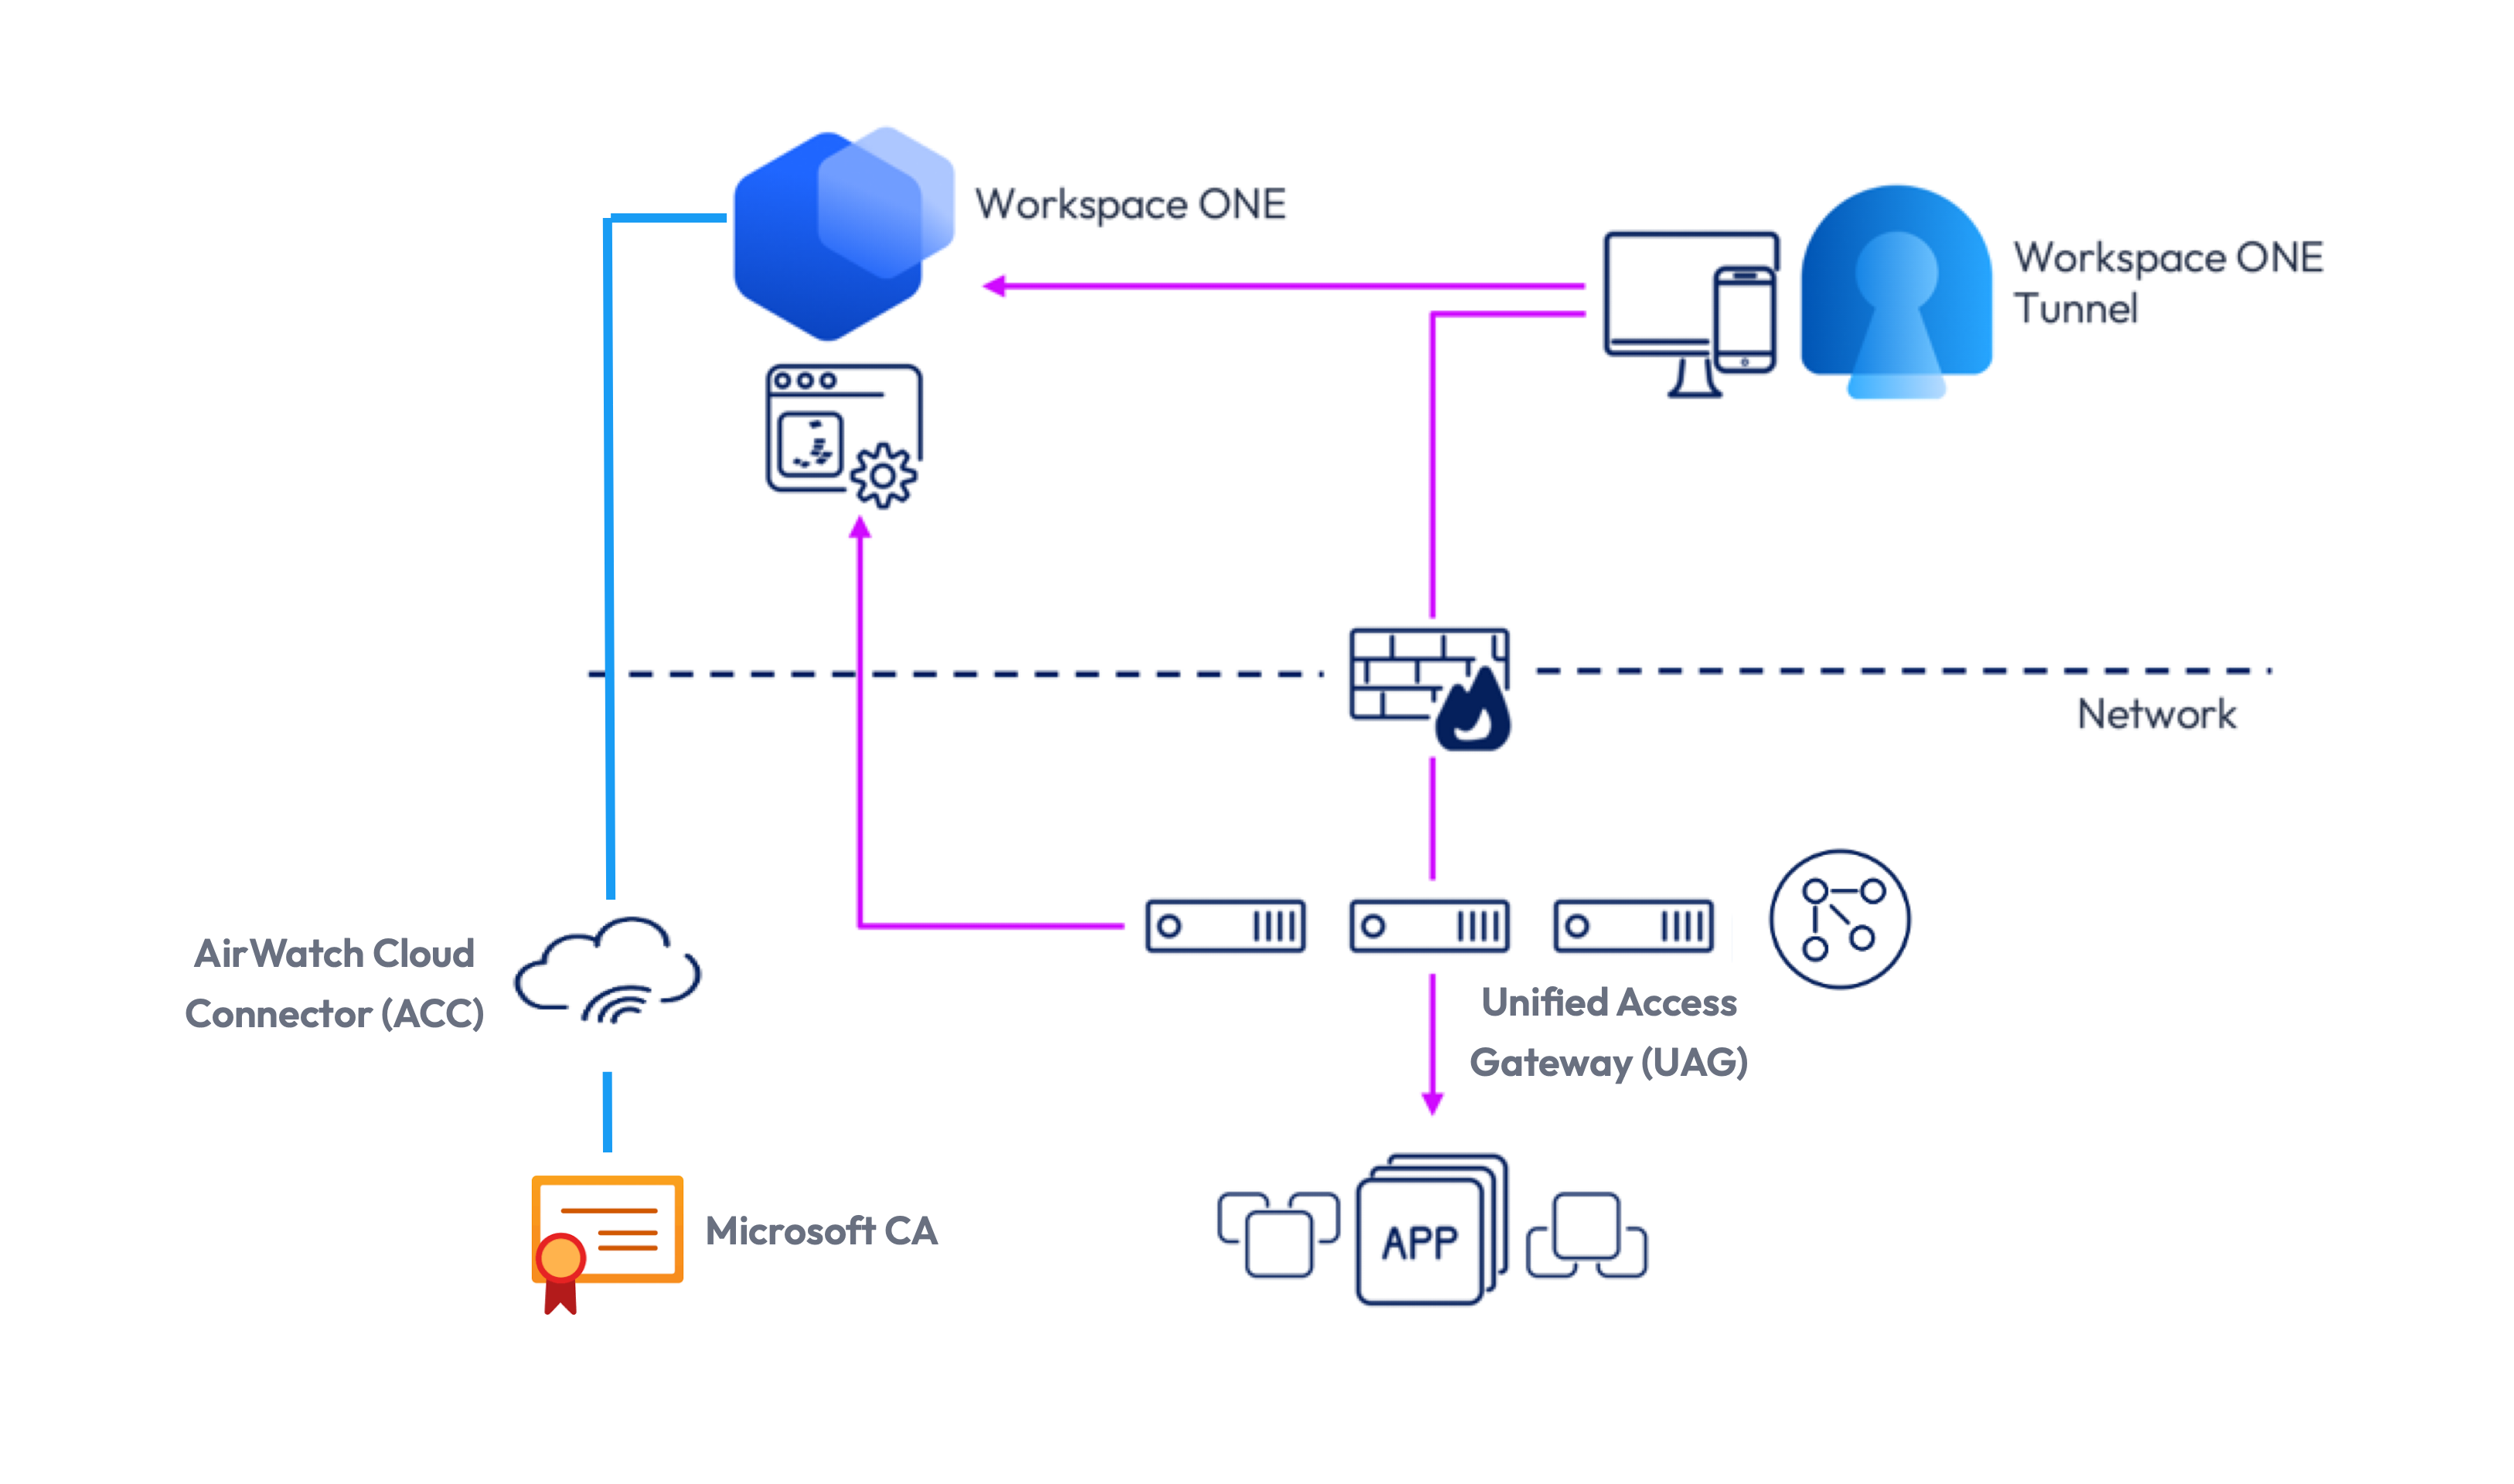
The purpose of this article is to detail how to change Tunnel over from the AirWatch CA to use a 3rd party CA such as the popular Microsoft Certificate Authority (CA).
This article details two options to deploy these certificates to Workspace ONE Tunnel:
- Microsoft certificate authority (CA) for direct integration with Workspace ONE UEM + AirWatch Cloud Connector (ACC) over the DCOM protocol
- Alternatively, Microsoft certificate authority (CA) over the NDES for SCEP protocol for integration with Workspace ONE UEM + AirWatch Cloud Connector (ACC)
I’d like to thank the technical advice and assistance of Hemanth Shivanna, Ashish Sharma, Martin Kniffin and Shane Fowler in writing this article.
Setup Workspace ONE Tunnel
The high level tasks to setup Tunnel are as follows:
- Deploy your Unified Access Gateway (UAG) appliance(s). Carl’s guide is the most comprehensive step by step guide to follow. Note that even if you switch the Tunnel certificates over from the AirWatch CA to your Microsoft CA, you don’t need to perform any configuration changes on your UAG appliance(s)
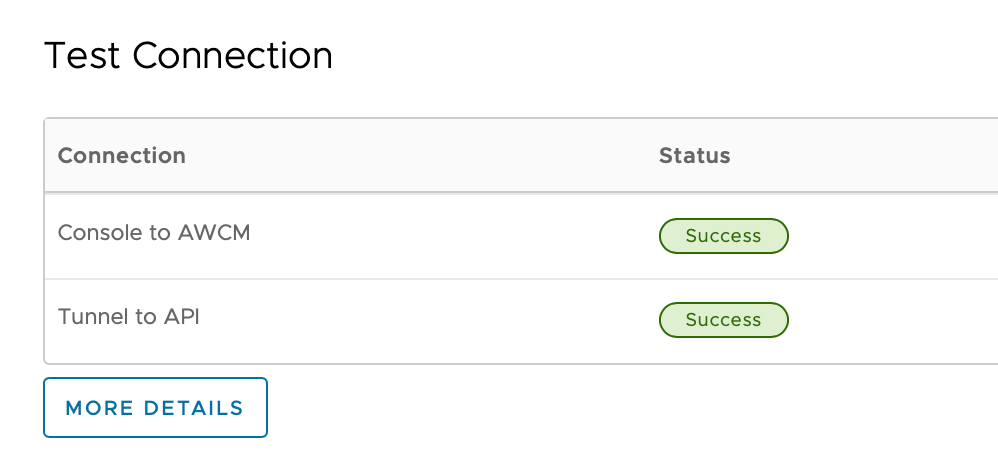
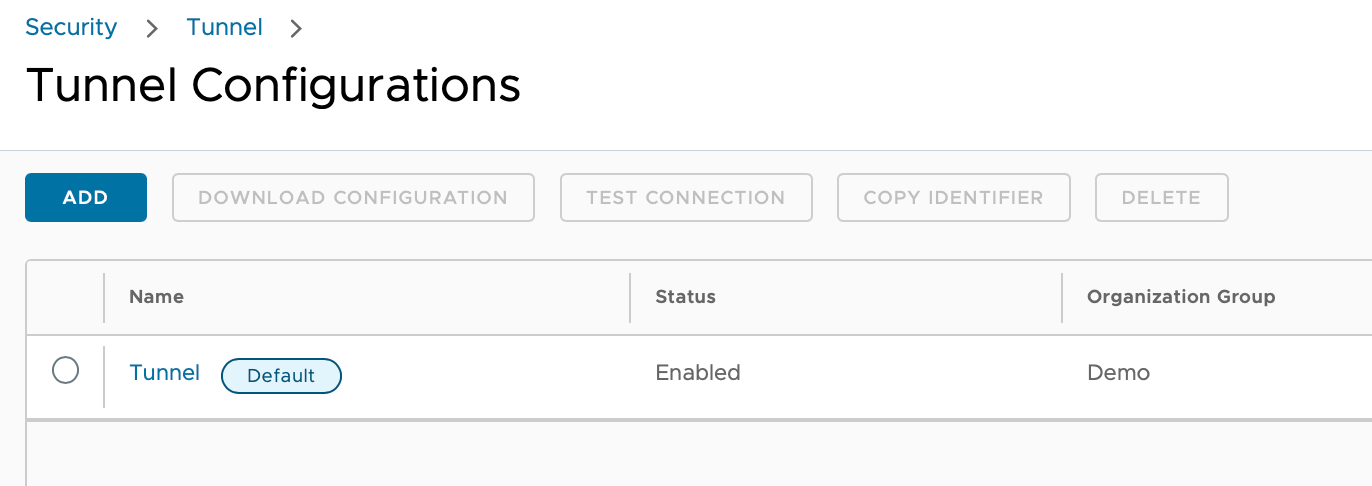
- Configure Workspace ONE Tunnel and ensure it’s reporting back correctly in the UEM console as shown:
- Deploy the Tunnel application and associated profiles to your test devices. Ensure you follow this kb to configure the new Omnissa Tunnel application for iOS and macOS devices.
- Define appropriate device traffic rules. In my lab it’s a Per Application policy:


- Test you can access intranet (internal) resources from a range of devices suitable for your company. ie. on iOS devices the VPN should automatically start when accessing say an intranet web page using Safari.
With your operational UAG appliances, follow Deploying Workspace ONE Tunnel: Workspace ONE Operational Tutorial to guide you through the process of setting up Tunnel in the UEM console. The guide Configuring the Tunnel Edge Service: Workspace ONE Operational Tutorial is also good to cross reference.
At this point, Tunnel will be working using the built-in AirWatch Certificate Authority (CA). We’ll now setup a Microsoft CA. Skip this section if you already have an operational CA in your organization.
Setup Microsoft Certificate Authority (CA)
Let’s now setup a Microsoft CA, if you don’t have one already in your company or lab (in my case). Again, I’ll defer to some fantastic existing guides and videos that step you through the process. Please see:
- Standing up a Microsoft Certificate Authority, starting with Part 1
- Deploy Certificate Services & Enterprise Root Certification Authority on Windows Server 2025 by Orin Thomas
- Active Directory Certificate Services Install & Config in just 20mins by Andy Malone
The associated Omnissa documentation in setting up the Microsoft CA is detailed here. Take note of completing Step 2, which is noted here:
Configure the CA to use Subject Alternative Name (SAN) in Certificates
Open a command prompt from the Windows Desktop and enter the following in the order they appear. These commands configure the CA to allow the use of the Subject Alternative Name (SAN) in a certificate.certutil -setreg policy\EditFlags +EDITF_ATTRIBUTESUBJECTALTNAME2 net stop certsvc net start certsvc
Add a Certificate Template to the CA in the CA (certsrv) window
I’ve detailed the various tasks from the Omnissa guide Step 3, with some few additional screen captures and amendments for clarity.
- In the left pane, select (+) to expand the CA directory.
- Right-click the Certificate Template folder and select Manage. The Certificate Templates Console window displays.
- Select the desired template (e.g., User) under Template Display Name, and right-click Duplicate Template. The Duplicate Template dialog box displays.
Workspace ONE UEM will use the duplicate certificate template. The template you choose depends on the function being configured in Workspace ONE UEM. For Wi-Fi, VPN, or Exchange Active Sync (EAS) client authentication select User template. For Tunnel, I used the User cert template.

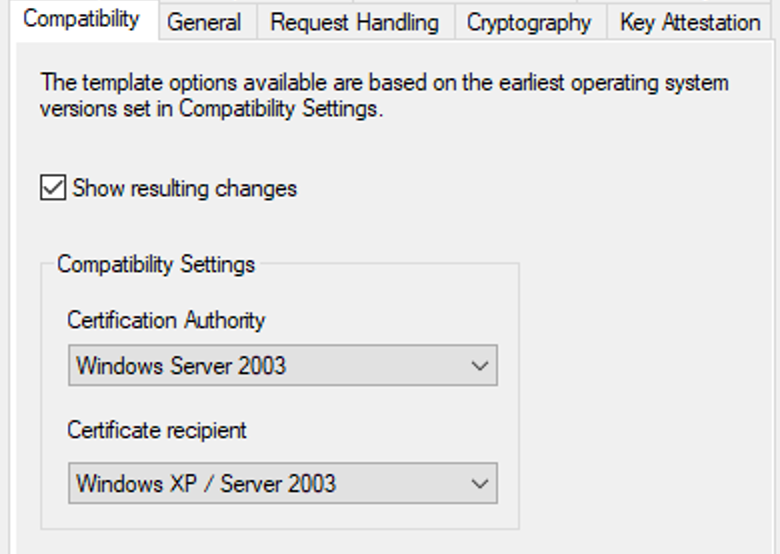
4. Select Compatibility and select the oldest enterprise version being used within the domain to ensure backward compatibility of the certificate that was issued. For example:
5. Click the General tab.
Type the name of the template displayed to users in the Template display name field. The Template name field auto-fills with the template display name without spaces. You may use this default value or enter a new template name if desired. The template name may not contain spaces. Make note of the template name. You will need to enter this information in Workspace ONE UEM at a later stage.
Select the desired length of time for the certificate to be active from the Validity period entry field/drop-down menu. You should choose a length of time that is less than the time you chose for the CA. By doing this the certificate will expire before the CA.

Click Apply.
6. Click the Request Handling tab.
Select the appropriate client authentication method from the Purpose: drop-down menu. This selection might be based on the application of the certificate being issued, although for general purpose client authentication, select Signature and Encryption.

Click Apply.
7. Select the Subject Name tab.
Select Supply in the request. If Supply in the request is not selected, the certificate will be generated to the service account instead of the desired end user.
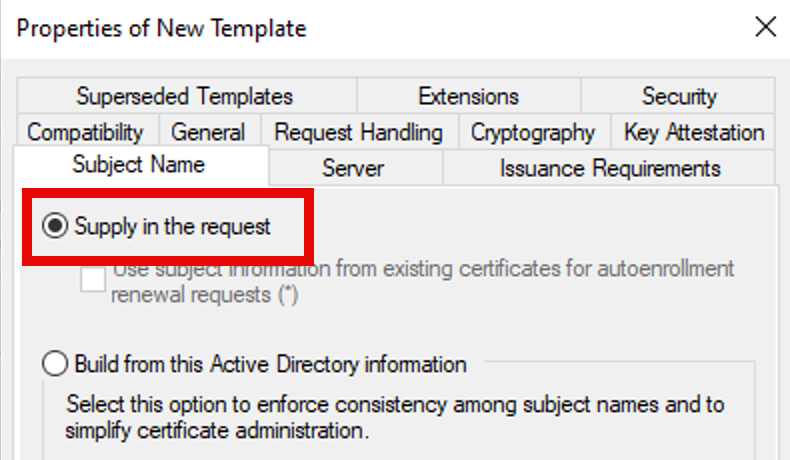
Note: Ignore any warning messages.
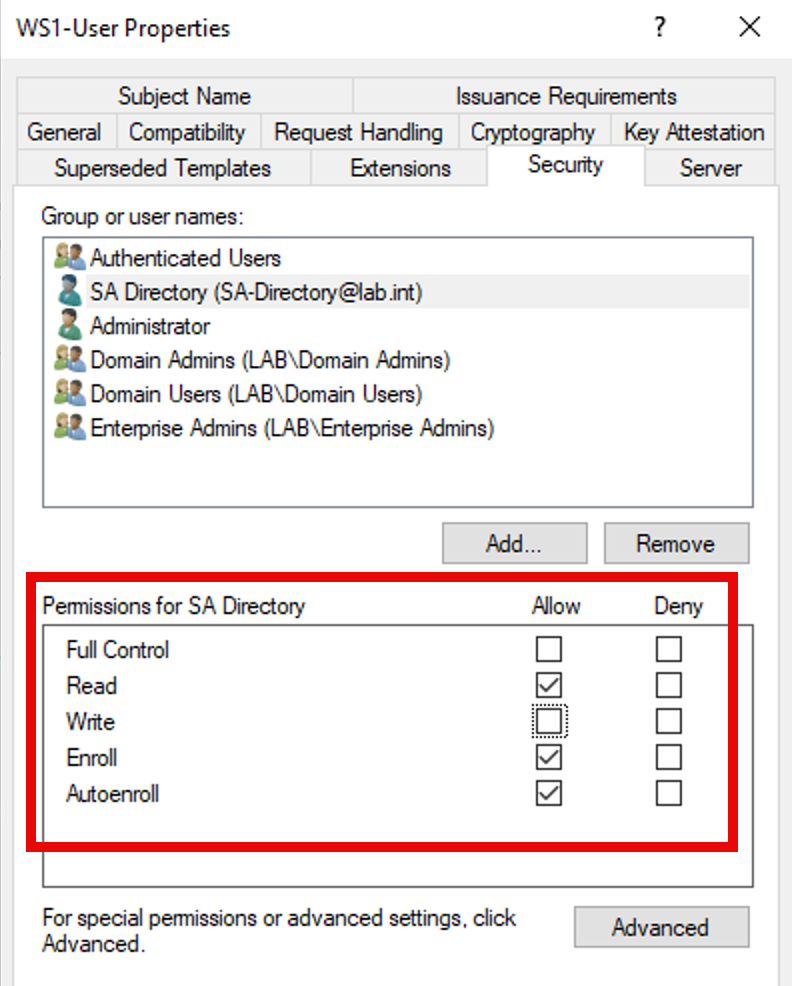
8. Provide the AD Service Account permissions to request a certificate.
Click the Security tab.
- Click Add. The Select Users, Computers, Service Accounts or Groups dialog box displays. This allows you to add the service account configured in Active Directory to request a certificate.
- Enter the name of the service account (e.g., Ima Service) in the Enter the object names to select field.
- Click OK. The Properties of New Template dialog box displays.
- Select the service account you created in the previous step (e.g., Ima Service) from the Group or user names: field.
- Select the Enroll checkbox under Permissions for CertTemplate ServiceAccount.
- Click OK.
For example:
Click OK to save this new CA template. For example:
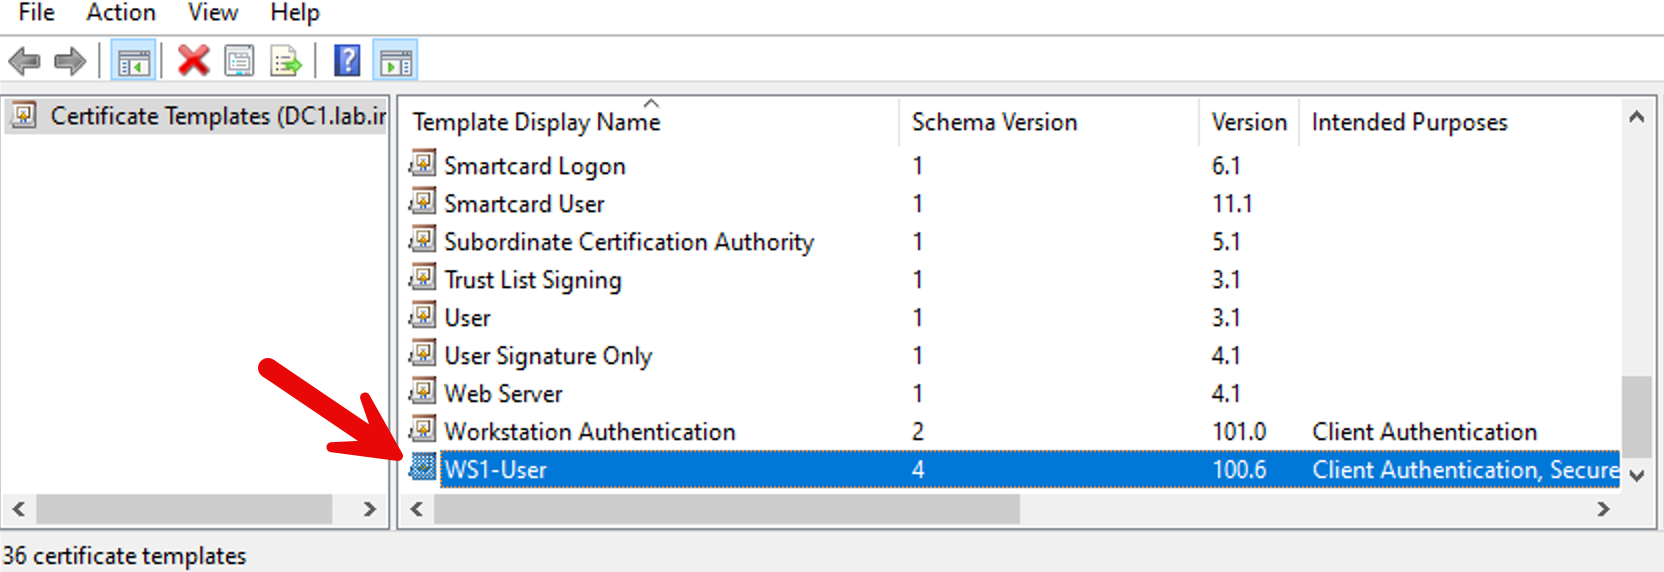
9. Finally, Enable the Certificate Template in the CA.
- Navigate to the Certificate Authority Console.
- Click (+) to expand the CA directory.
- Click Certificate Templates folder.
- Right-click and select New > Certificate Template to Issue. The Enable Certificates Templates dialog box displays.
- Select the name of the certificate template (for example, WS1-User in my case) that you previously created in Creating a Name for the Certificate Template.
- Click OK.
Ensure the AirWatch Cloud Connector (ACC) is enabled for Certificate Authorities
You’ll most likely already have an AirWatch Cloud Connector (ACC) installed on-premises, however you also need to ensure it’s setup to support an on-prem CA. To do this login to the Workspace ONE UEM admin console, select Group & Settings – System – Enterprise Integration – Cloud Connector and make sure it’s Enabled next to Microsoft Certificate Services and Simple Certificate Enrollment Protocol (SCEP) as shown below:

Make sure you save this by scrolling to the bottom of the window and clicking Save as shown. You can also perform a Test Connection too.

Note: We’re enabling SCEP now in case you configure this as an alternative to DCOM communication to your Microsoft CA.
Configure the CA and the certificate template in Workspace ONE UEM
Next you’ll configure the CA and the certificate template in Workspace ONE UEM so that Workspace ONE UEM can retrieve a certificate from a CA (via your on-premises ACC) using ADCS (DCOM).
- Login to the Workspace ONE UEM console as a user with Workspace ONE UEM Administrator privileges, at minimum.
- Navigate to System > Enterprise Integration > Certificate Authorities.
- Click Add.
- Select Microsoft ADCS from the Authority Type drop-down menu. You need to select this option prior to populating other fields in the dialog so applicable fields and options display.
- Enter the following details about the CA in the remaining fields as shown:

Click the Test Connection button and if everything’s setup correctly, you’ll briefly see this message at the top of the screen:

Next, you’ll configure the certificate template. Select the Request Templates tab.
Click Add.
Complete the certificate template information using the following example:
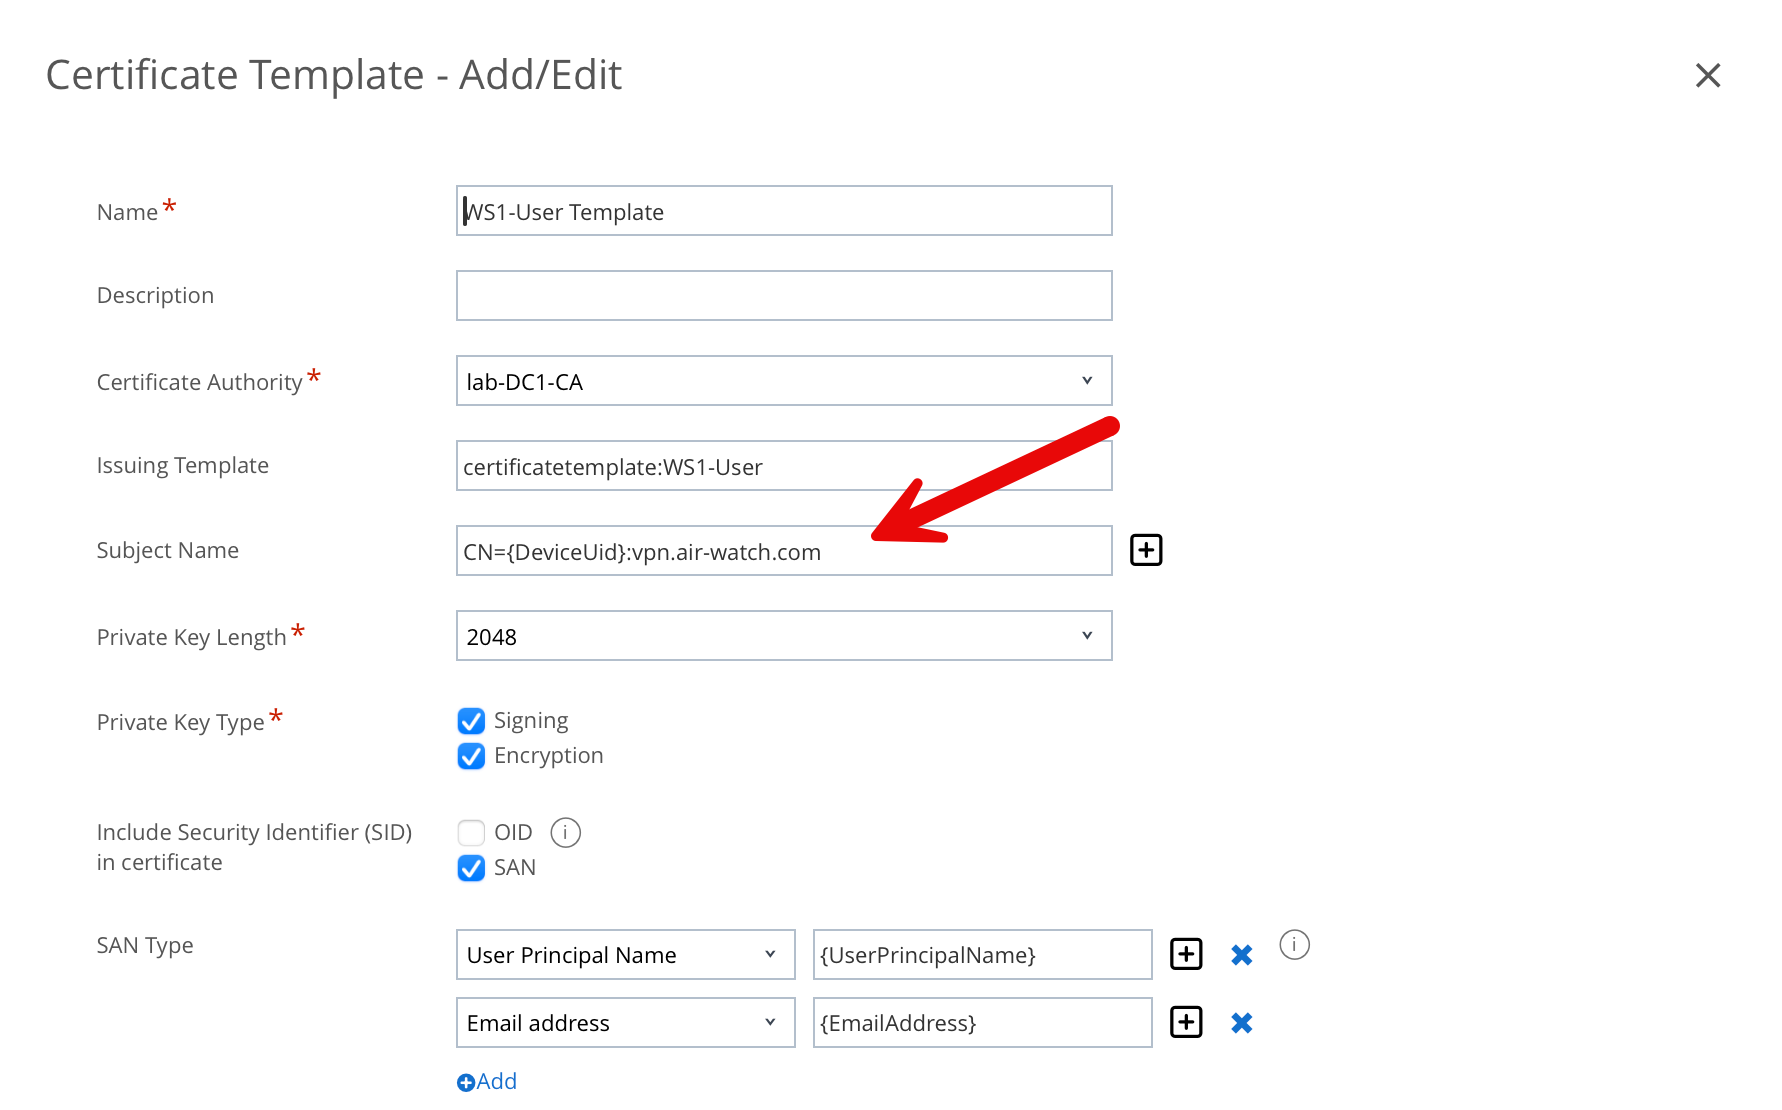

Note: as marked above with the red arrow, in order for the Tunnel gateway to trust certificates issued by a third-party CA, the CA template must contain CN={DeviceUid} in the subject name and a Subject Alternate Name (SAN) certificate. If the Windows desktop Tunnel client is used with the Per-App Tunnel, then the template must contain CN={DeviceUid}:vpn.air-watch.com
This can be amended to CN={DeviceUid}:vpn.air-watch.com, SAN:upn={UserPrincipalName} if the same certificate is used for SSO. Click Save.
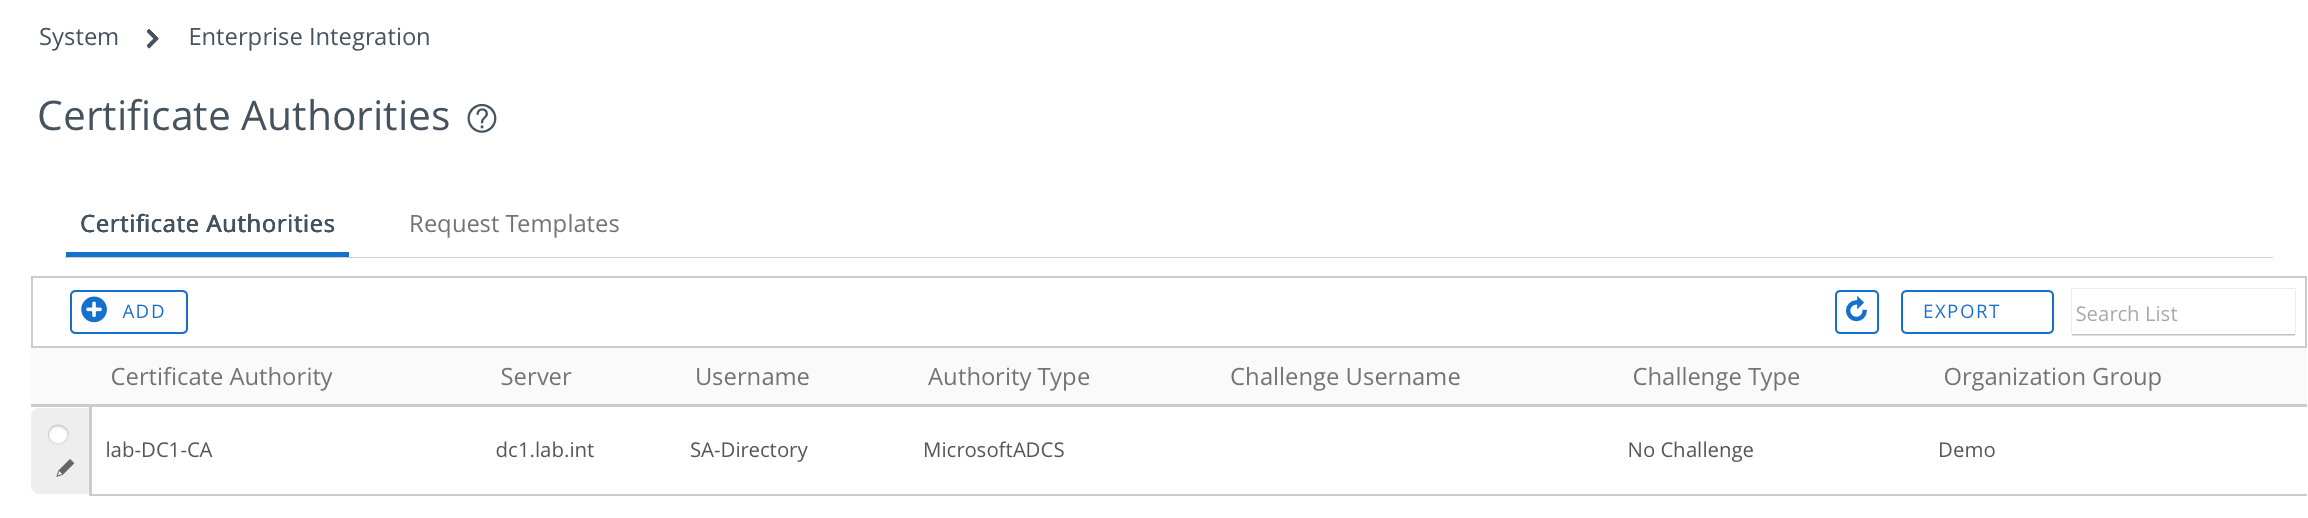
The final CA and CA template should look something like this:

Create a Server Certificate for the Tunnel Service (from your Microsoft CA)
I followed these steps to create a Server Certificate from my Microsoft CA in PFX format, for the Tunnel Service. I used a Mac which includes openssl.
1. First generate a Private Key using this command:
openssl genrsa -out tunnelserver.key 2048
2. Create the Certificate Signing Request (CSR). Note, DO NOT enter an email address in the CSR. Make sure you press enter for no value.
For Common Name, enter the DNS name of your UAG (tunnel service). In my case tunnel.eucau.com

If you enter an email, this will result in the email address in the certificate being listed above the CN in the certificate as shown:

So the CSR command is:
openssl req -new -key tunnelserver.key -out tunnelserver.csr
Here is an example of a correctly formatted cert for the Tunnel Server:

3. Copy the CSR to your Windows CA server and enter this command:
certreq -submit -attrib "CertificateTemplate:WebServer" tunnelserver.csr
Save the issued certificate as tunnelserver.cer
4. We’ll next export the root certificate. Open the Certification Authority console on your CA server:
a. Start > type Certification Authority > press Enter.
b. Right-click the CA name at the top of the tree. Choose Properties.
c. In the Properties window, go to the General tab.
d. You’ll see the CA’s certificate listed. Click View Certificate.
e. In the Certificate window, go to the Details tab.
f. Click Copy to File… The Certificate Export Wizard will start:
g. Choose DER encoded binary (.CER) or Base-64 encoded (.CER) (choose Base-64 for easier compatibility with Linux systems).
h. Click Next, choose a save location, and give it a .cer extension. A name such as rootca.cer
i. Click Finish.
Copy both the the tunnelserver.cer and rootca.cer back to your computer (in my case my Mac).
5. We’ll next convert the rootca.cer to PEM format with the following command:
openssl x509 -inform der -in rootca.cer -out rootca.pem
A PEM file is readable.
6. Finally, let’s create a certificate that combines the certificate, issuing root certificate and private key into a PFX file which we can load into Workspace ONE UEM console. The command I used was as follows:
openssl pkcs12 -export -inkey tunnelserver.key -in tunnelserver.cer -certfile rootca.pem -out tunnelserver.pfx
Create a password for the .pfx as appropriate.
Ok, you’re nearly there!
Change Workspace ONE Tunnel over to your Microsoft CA (DCOM)
Login to the Workspace ONE UEM administrator console. From the Console menu, go to: Groups & Settings > All Settings > Configurations > Omnissa Tunnel
Click your default Tunnel configuration as shown:
Select Client Authentication and change the Authentication from AirWatch to Third Party as shown. Select your Certificate Authority and Certificate Template. My settings are shown as an example:

Under Root Certificate, click Add Certificate and upload your Root CA (ie. rootca.cer)
At the top of the screen click Save. This should correctly save and the Client Certificate details should be updated as shown above (Thumbprint).
Note: If you have an intermediate certificate, click Add Certificate to upload that as well. This will result in the Thumbprint details being separately shown as follows:

Next select Server Authentication and change the Authentication from AirWatch to Third Party as shown.

Click Add Certificate and upload the server cert (tunnelserver.pfx) you created above and enter the appropriate password you entered.

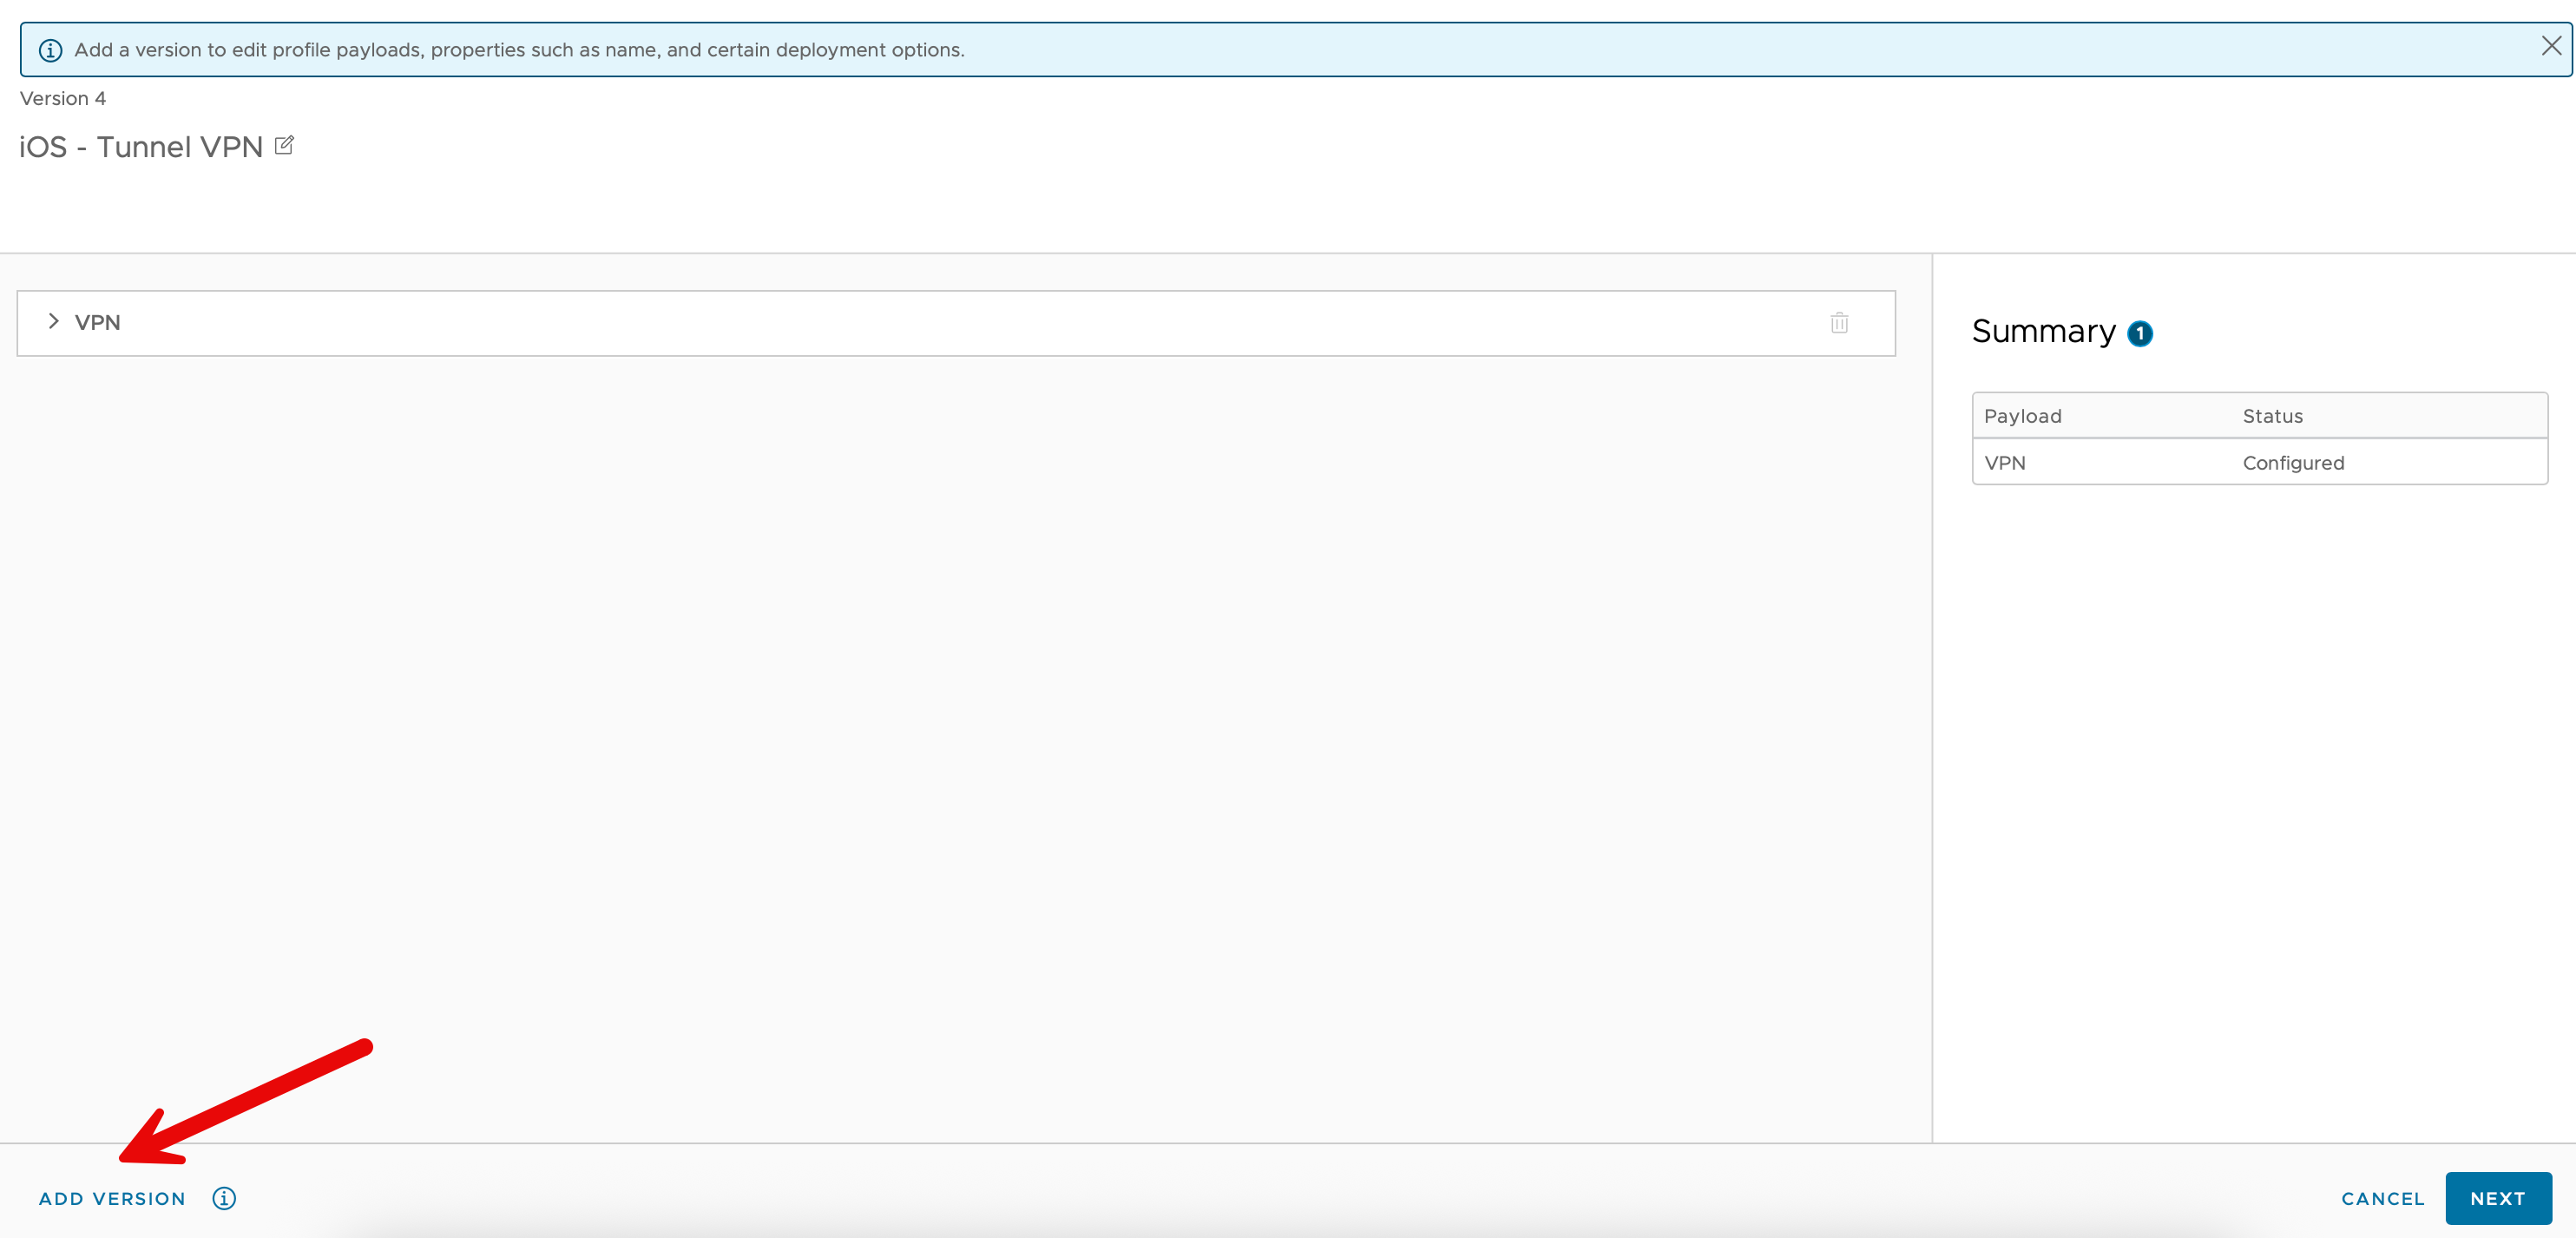
Re-publish any existing Tunnel profiles
To ensure your devices Tunnel applications receive their own Microsoft client certificate, select your applicable tunnel profiles and select Add Version. Click Next and Save & Publish.
Wait for this to be deployed to all of your applicable devices.
That’s it! Tunnel will function as it did before, but will be using your Microsoft CA issued certificates.
Network Device Enrollment Service (NDES) for Active Directory Certificate Services (ADCS)
An alternative to deploying 3rd party certificates using DCOM (above) is to use Network Device Enrollment Service (NDES). It’s one of the role services of Active Directory Certificate Services (AD CS). NDES acts as a Registration Authority to enable the software on routers and other network devices running without domain credentials to get certificates based on the Simple Certificate Enrollment Protocol (SCEP).
The steps below detail how to install this service, add this CA within Workspace ONE UEM so that Workspace ONE Tunnel can use these certificates.
Add the Network Device Enrollment Service Role
This is the Microsoft implementation of SCEP, and it’s part of the Network Device Enrollment Service (NDES) role on Windows Server.
- On your CA server (or a separate server), open Server Manager.
- Go to Manage > Add Roles and Features
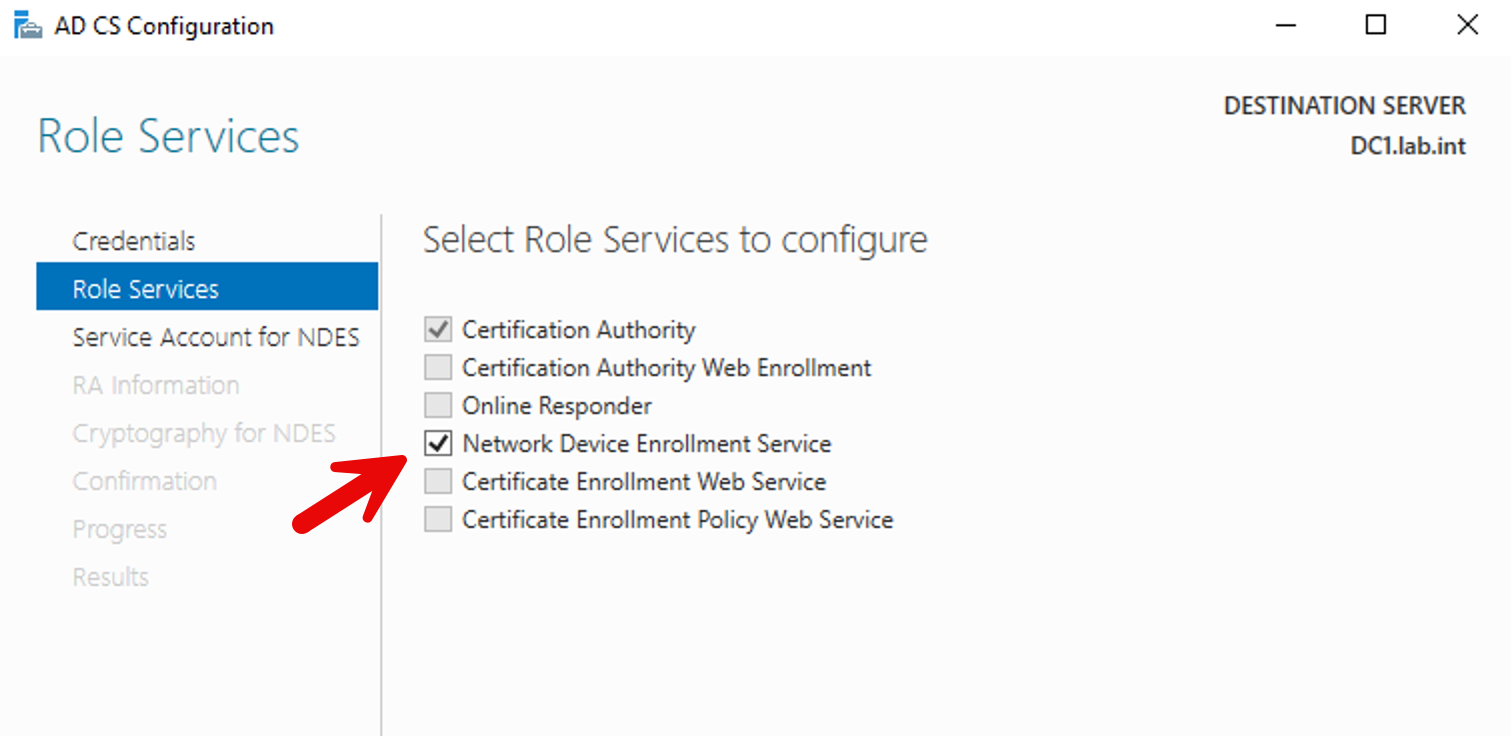
- Select Active Directory Certificate Services role.
- Within that, select Network Device Enrollment Service (NDES).

5. On the following pop up, click Add Features
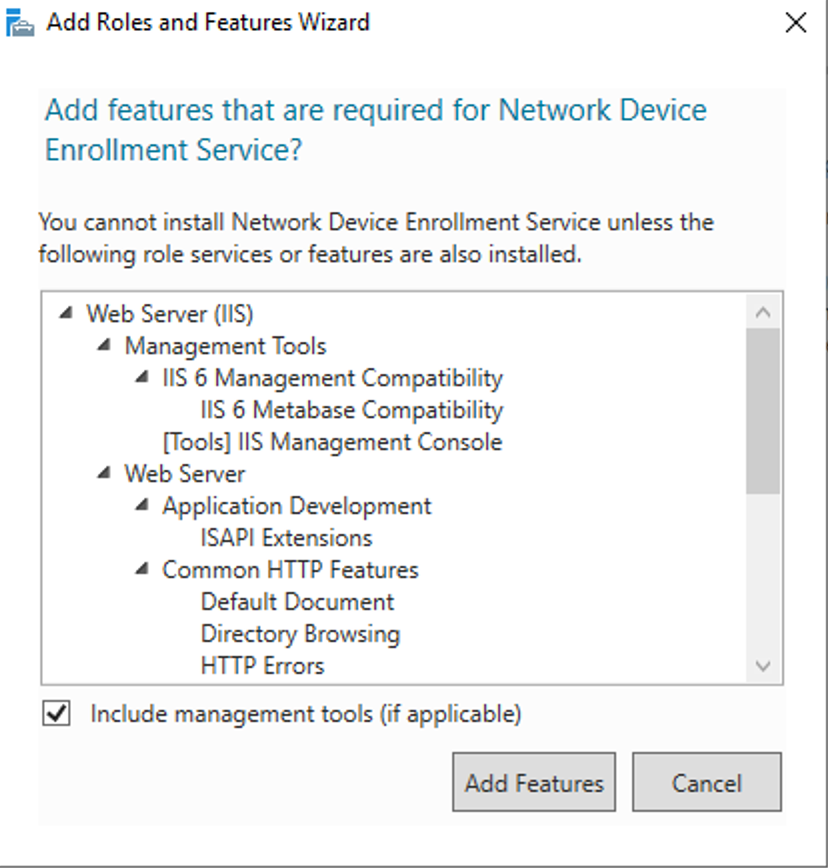
6. Click Add Features
7. Click Next, a few times through to the end and then click Finish to complete the installation wizard.
Configure NDES
After the NDES application has been installed, you’ll next configure this service.
- In Server Manager, select Active Directory Certificate Services.
- Click More… in the notifications area (flag icon) if configuration is required.
- Configure NDES as follows:
3. Click Next and configure the appropriate service account. This account must be member of IIS_IURS group. For example:

4. Configure any information as follows:

5. Accept the Cryptography for NDES settings and click Next

6. Review the ADCS information for NDES, and click Configure
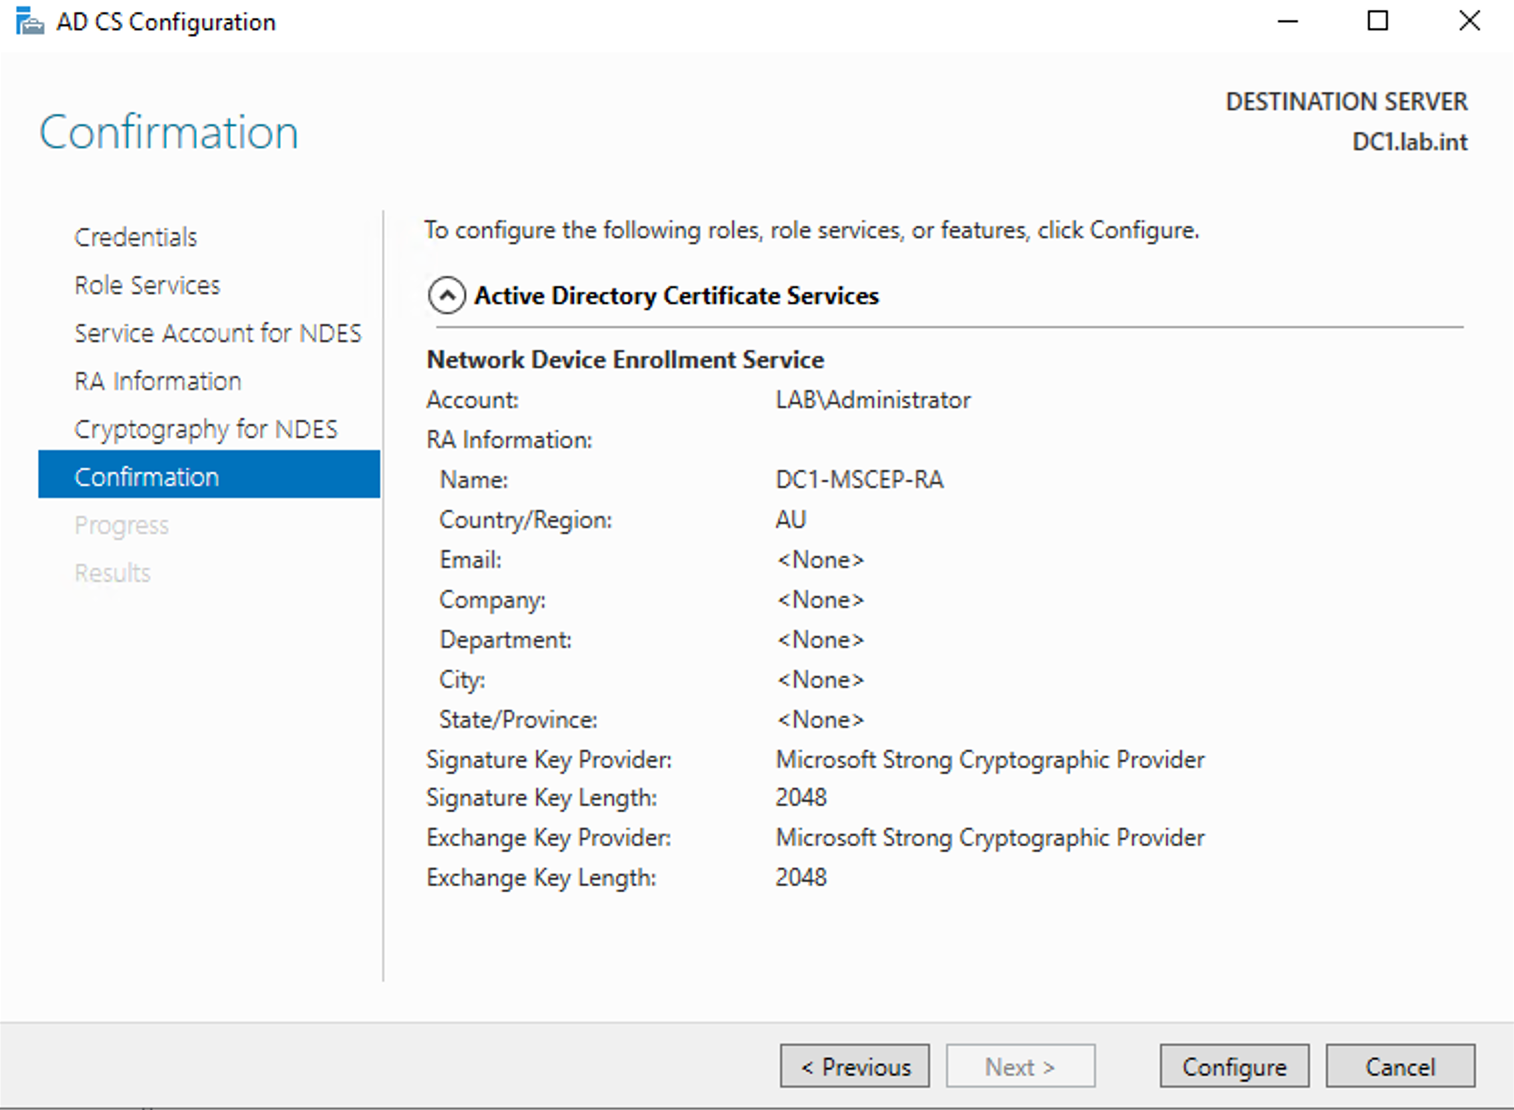
7. When this NDES successfully configured, you’ll see the following.


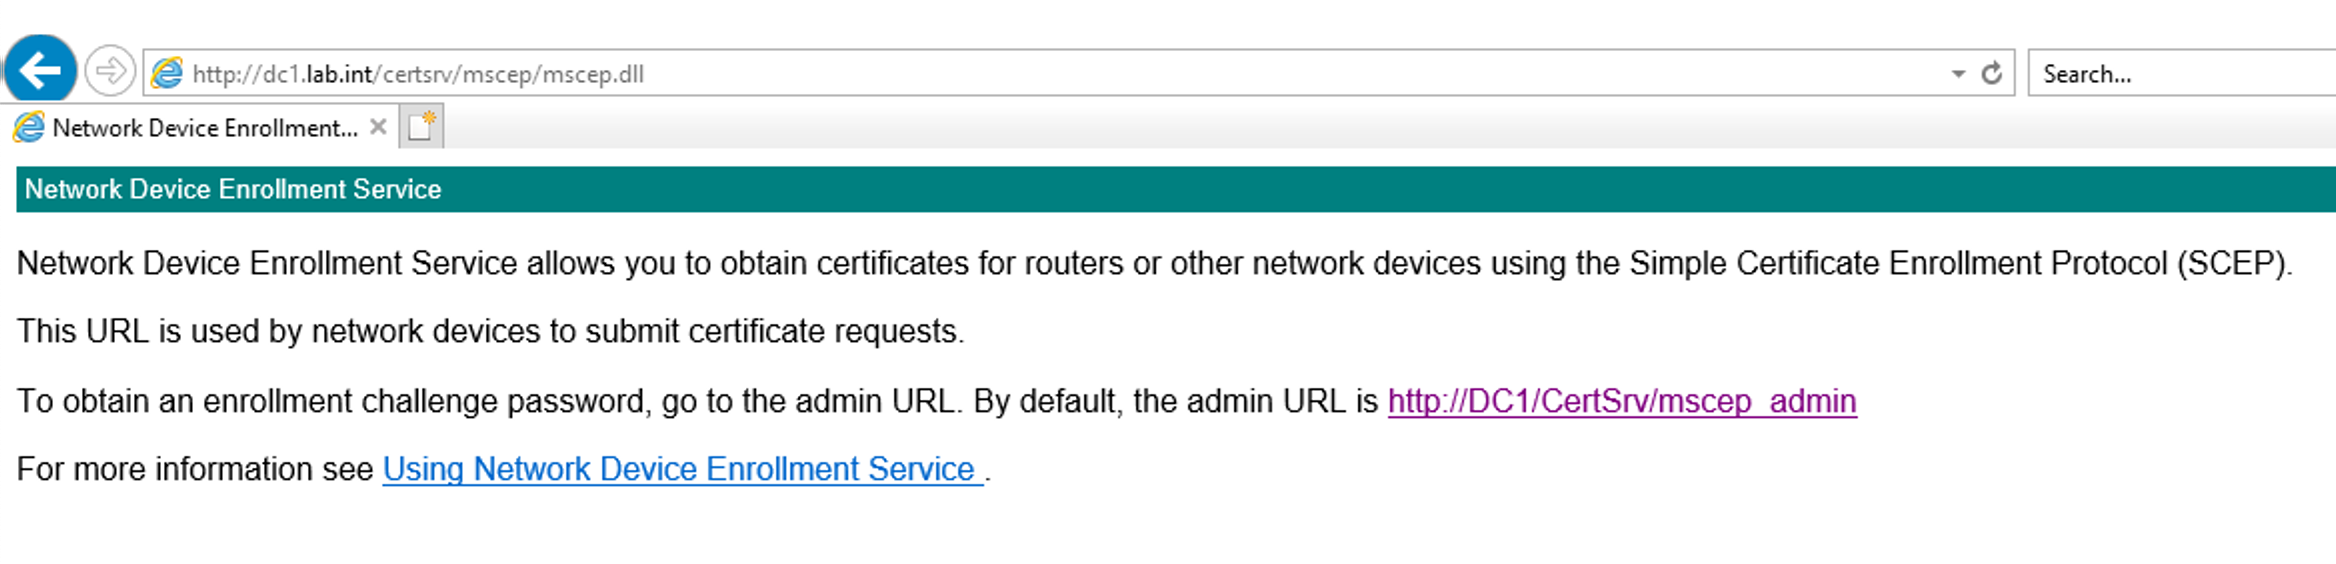
8. Using a web browser on your internal network, check you can access the NDES service using the appropriate DNS name. For example:
Specify the Certificate Template for NDES/SCEP
As outlined in the Omnissa documentation here, you’ll specify the certificate template that NDES will use to issue certificates.
- Run the Registry Editor by running
regedit.exefrom the Windows Desktop. - Navigate to
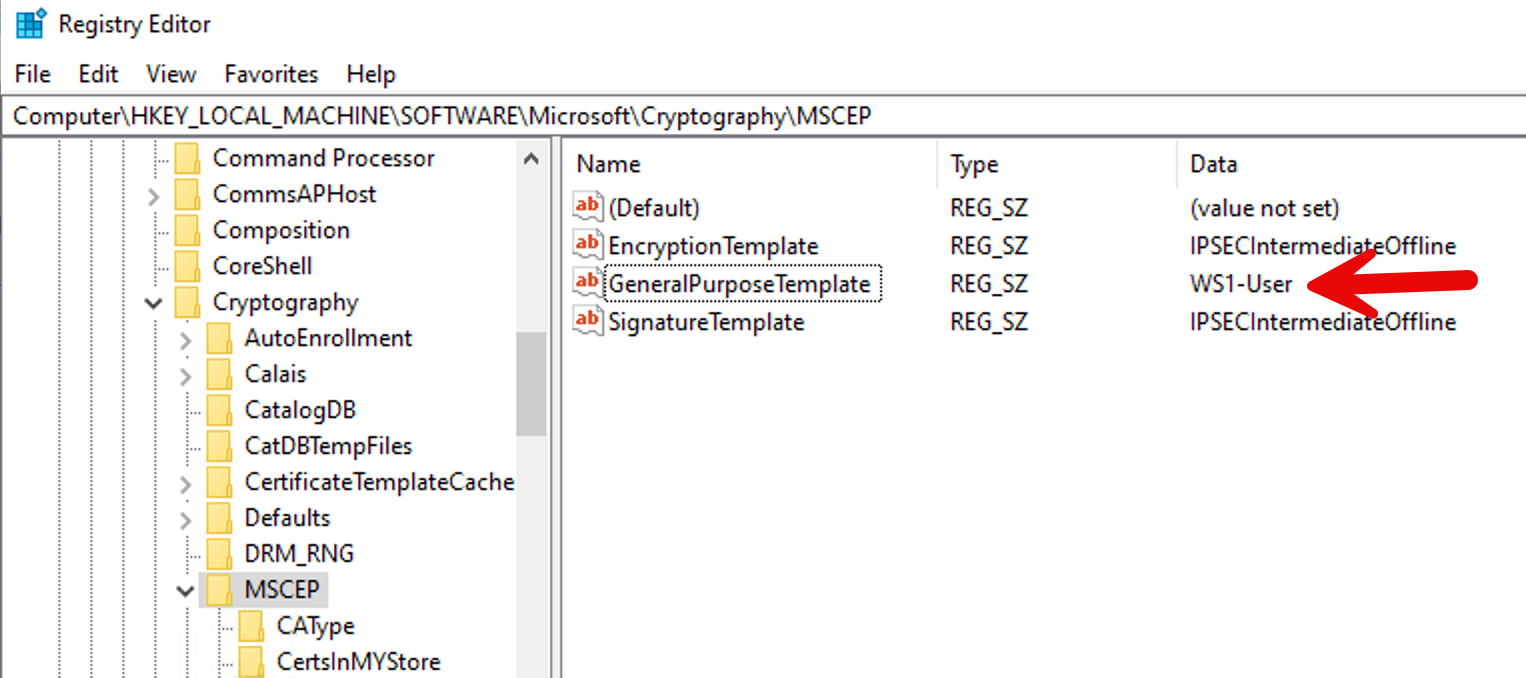
HKEY_LOCAL_MACHINE\SOFTWARE\Microsoft\Cryptography\MSCEP(or NDES/SCEP). - Right-click the GeneralPurposeTemplate and select Modify.
- Replace the value
IPSECIntermediateOfflinewith the template name being used. In my lab, I changed the default value:

5. to WS1-User in my lab:
6. Close the Registry Editor.
7. Restart Internet Information Services by opening a command prompt and running iisreset.
8. Next we’ll Configure IIS to allow for large query strings. When the device requests a certificate from NDES/SCEP, it sends a string of over 2700 characters as part of the request. This string is larger than the default size for query strings and results in a 404.15 error. The default query string length must be increased to accommodate this large string.
Open a command prompt from the Windows Desktop.
Enter c:\windows\system32\inetsrv\appcmd.exe set config -section:system.webServer/security/requestFiltering /requestLimits.maxQueryString:"3072" /commit:apphost
Configure the NDES CA and the certificate template in Workspace ONE UEM
Next you’ll configure the CA and the certificate template in Workspace ONE UEM so that Workspace ONE UEM can retrieve a certificate from a CA (via your on-premises ACC) using NDES/SCEP
- Login to the Workspace ONE UEM console as a user with Workspace ONE UEM Administrator privileges, at minimum.
- Navigate to System > Enterprise Integration > Certificate Authorities.
- Click Add.
- Select Microsoft ADCS from the Authority Type drop-down menu and Protocol SCEP. You need to select this option prior to populating other fields in the dialog so applicable fields and options display.
- Enter the following details about the CA in the remaining fields as shown:


Note the key SCEP URL is: http://hostname/certsrv/mscep/mscep.dll, the SCEP Challenge URL is: http://hostname/certsrv/mscep_admin/. Replace hostname with your appropriate DNS name.
Click the Test Connection button and if everything’s setup correctly, you’ll briefly see this message at the top of the screen:
Next, you’ll configure the certificate template. Select the Request Templates tab.
Click Add.

Note: as marked above with the red arrow, in order for the Tunnel gateway to trust certificates issued by a third-party CA, the CA template must contain CN={DeviceUid} in the subject name and a Subject Alternate Name (SAN) certificate. If the Windows desktop Tunnel client is used with the Per-App Tunnel, then the template must contain CN={DeviceUid}:vpn.air-watch.com
Click Save.
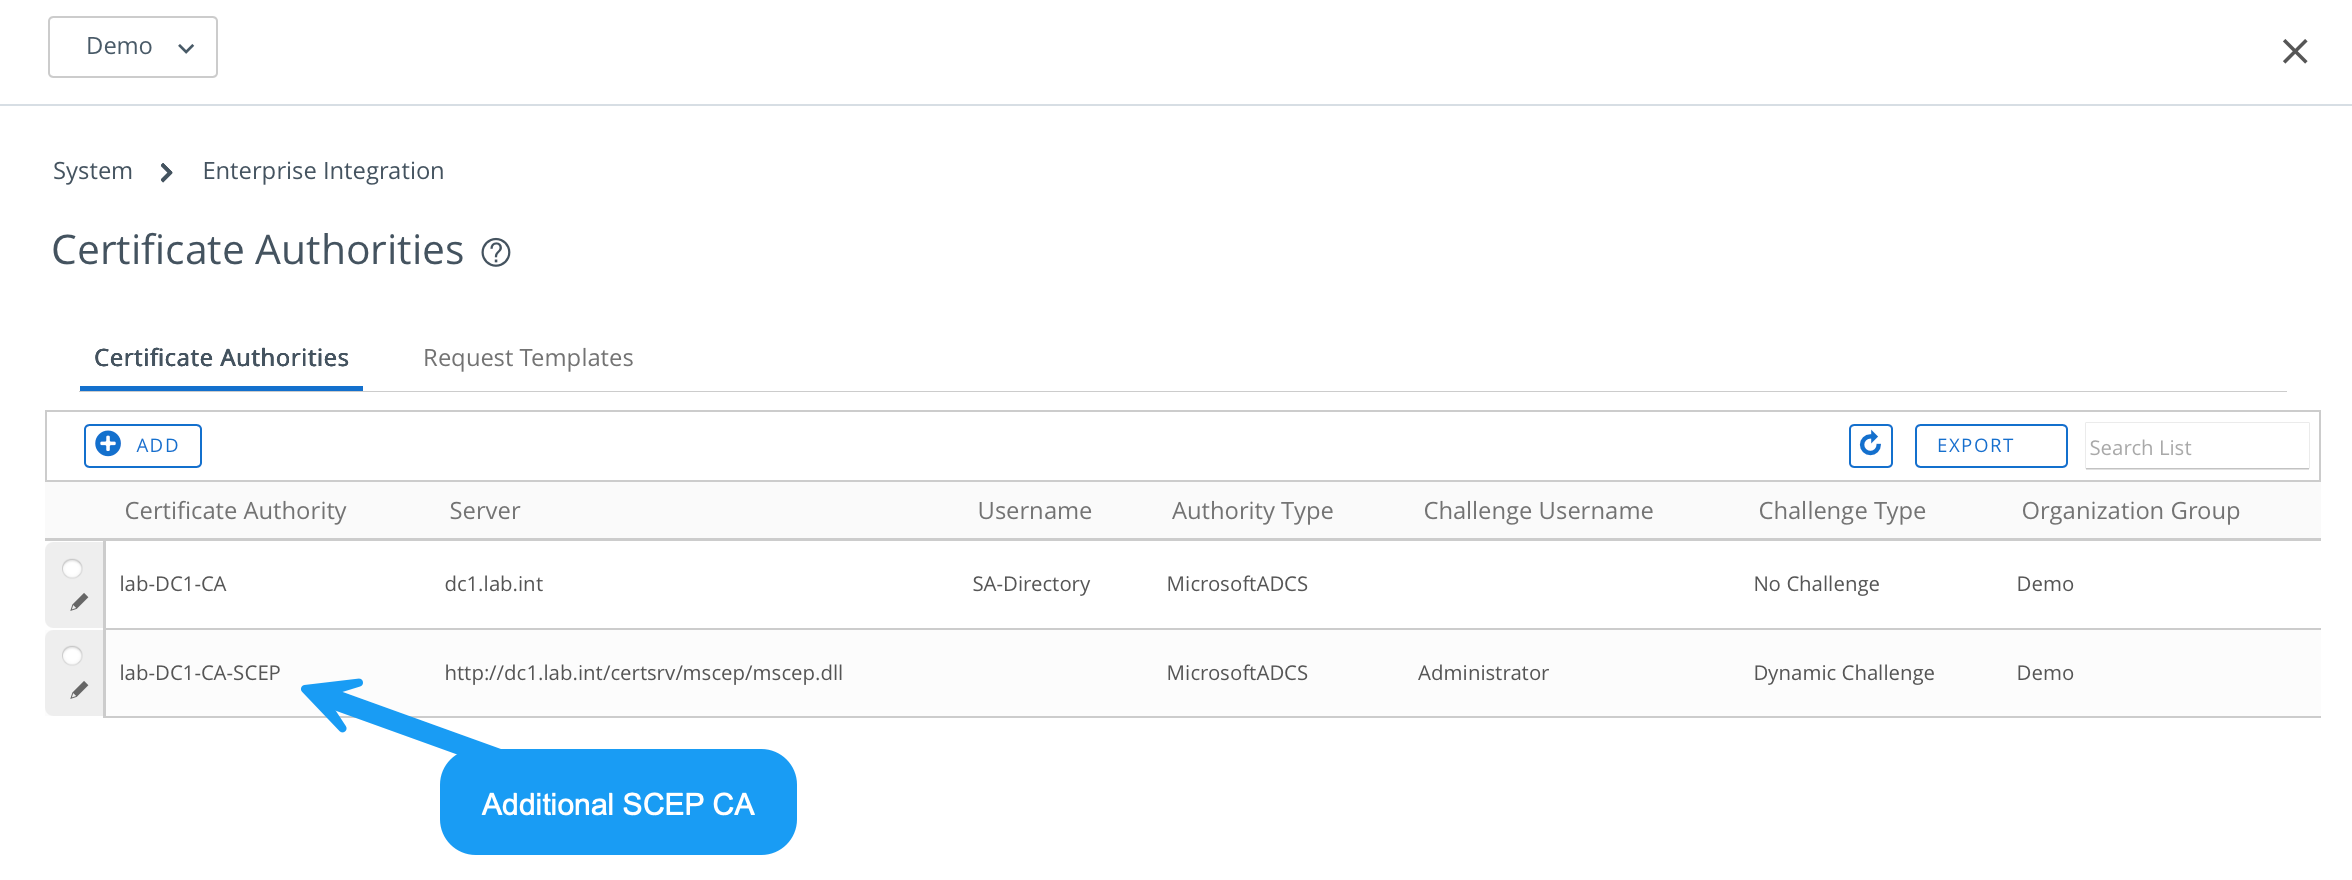
The final CA and CA template should look something like this:

Change Workspace ONE Tunnel over to your Microsoft CA (SCEP)
Login to the Workspace ONE UEM administrator console. From the Console menu, go to: Groups & Settings > All Settings > Configurations > Omnissa Tunnel
Click your default Tunnel configuration as shown:
Select Client Authentication and change the Certificate Authority and Certificate Template to the SCEP CA and Certificate Template as shown.

Click Save.
Re-publish any existing Tunnel profiles
To ensure your devices Tunnel applications receive their own Microsoft client certificate (using SCEP), select your applicable tunnel profiles and select Add Version. Click Next and Save & Publish.
Wait for this to be deployed to all of your applicable devices.
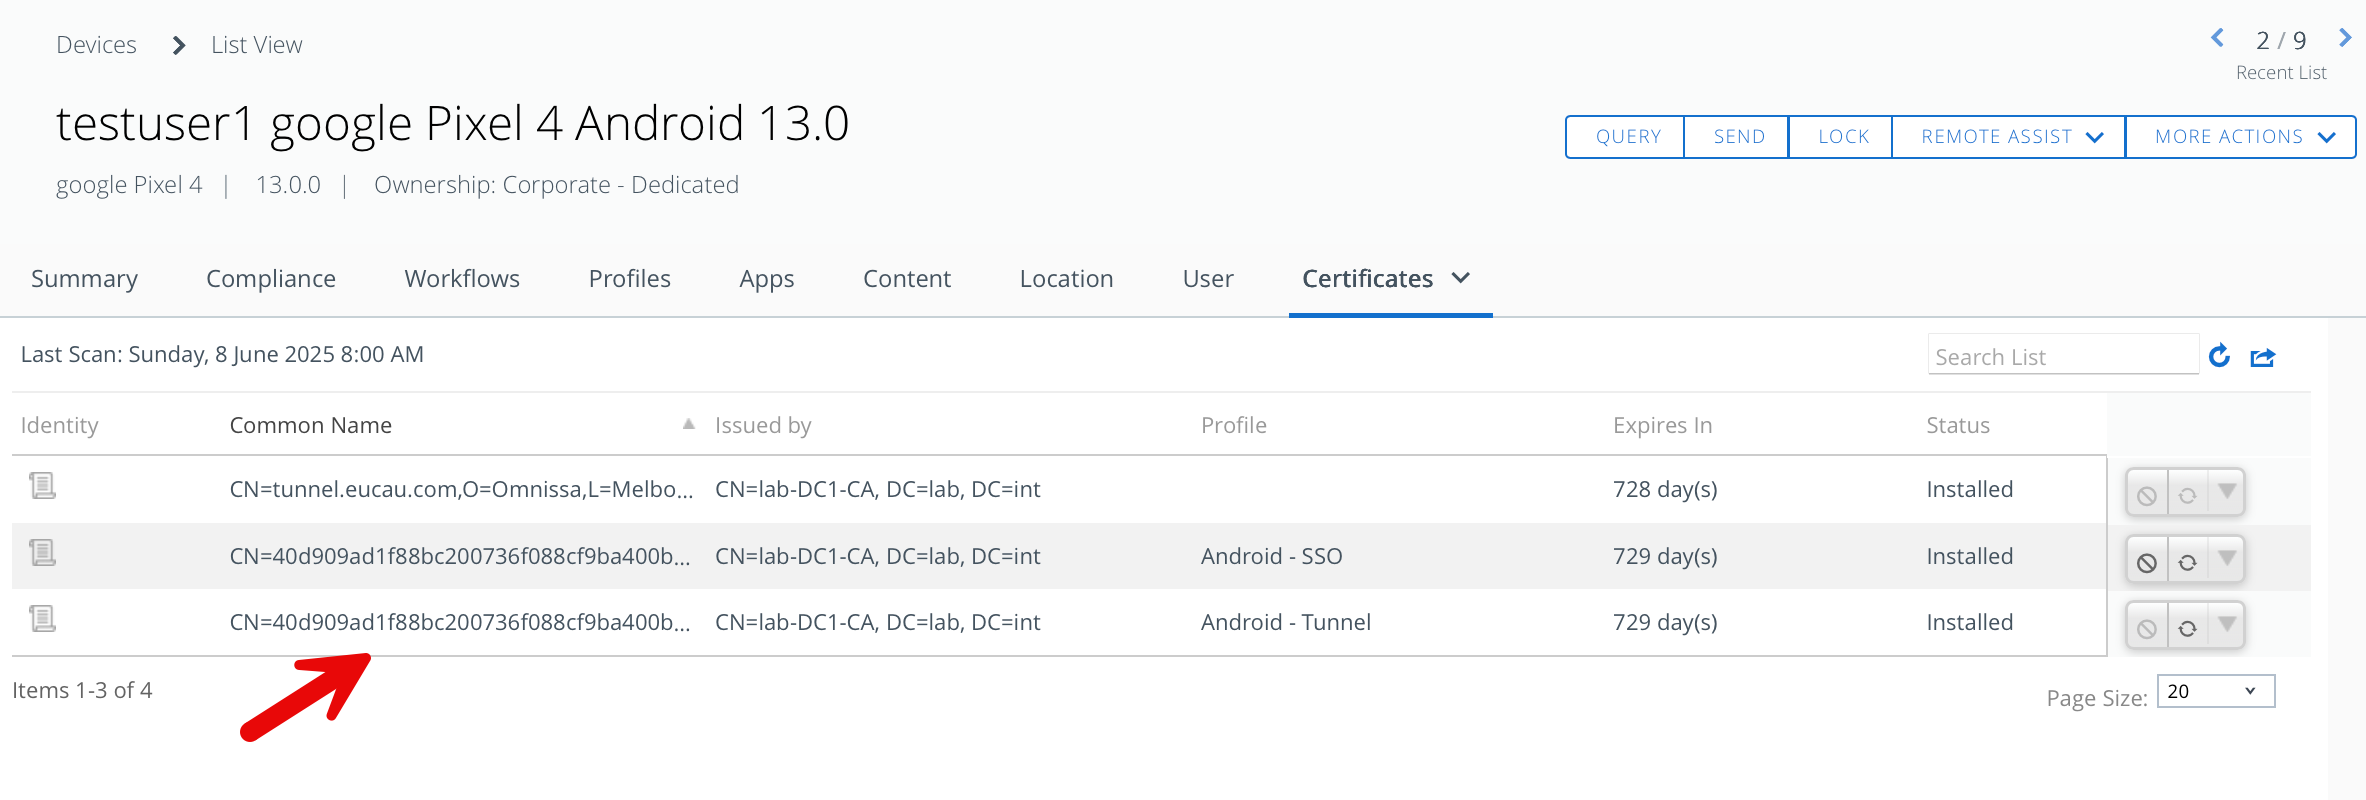
The certificate is issued by the Microsoft CA and can be verified on a device by looking at a devices certificates as shown:

That’s it! Tunnel will function as it did before, but will be using your Microsoft CA issued certificates using NDES/SCEP.
