
Omnissa Digital Employee Experience (DEX) measures workplace experience, analyzes data, helps deliver a high-level employee experience, and helps remediate issues that may arise. For example, you can use DEX to ensure that your employees are satisfied with their work environment and technology experience.

Omnissa DEX is primarily used for Windows and macOS devices, although there are capabilities available for Android Rugged and mobile applications on iOS and Android.
Omnissa DEX can be enabled for devices managed by Workspace ONE UEM and also Windows devices managed by Microsoft Intune/SCCM and other PCLM tools such as Ivanti, BigFix and Tanium.
The purpose of this article is to detail the steps required to deploy Omnissa DEX. These excellent step by step instructions were written by my colleague Eri Ang (Staff Specialist Solution Engineer, Omnissa). I updated this article after further testing, documented some additional options for a silent install of the Hub in February 2023.
Commonly Asked Questions
Before you get started, I’d recommend you review the commonly asked questions from the Experience Management documentation.
Setting Up Cloud-Based Omnissa Workspace ONE
You’ll first need to activate a free trial of Workspace ONE UEM (SaaS). You can follow the step by step guide I co-wrote in March 2022 which is available here on Techzone. The guide will step you through:
- Acquiring a Cloud-Based Workspace ONE Environment
- Registering Workspace ONE with Apple and Google (if you’re managing mobile devices)
- Integrating Workspace ONE UEM, Workspace ONE Access, and Active Directory
- Additional Identity and Access Management Tasks
Step by step video
My colleague Pratheep Vinayagamoorthy (Omnissa Director, Experience Solutions Sales – APJ) put together this step by step video of the steps you’ll follow in the rest of this article.
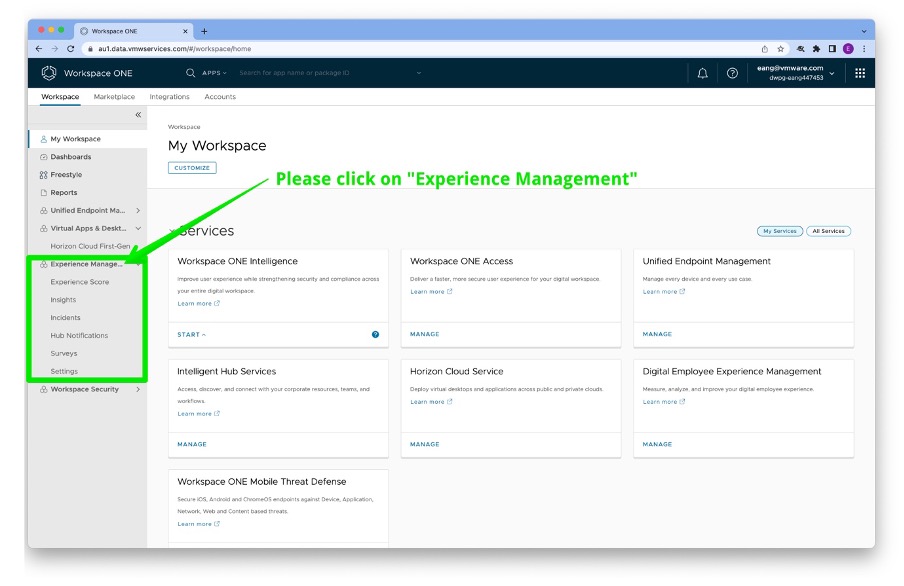
Enable Workspace ONE Intelligence
Workspace ONE Intelligence is the core data platform which is leveraged by Omnissa DEX. Follow these instructions to enable Workspace ONE Intelligence (a video is also provided too).
Enable Desktop Experience Management
Within the Workspace ONE Intelligence console, select Desktop Experience Management and Enable this feature.

Omnissa DEX for Workspace ONE UEM Managed Devices
Windows devices
Windows 10 and 11 devices managed by Workspace ONE UEM will automatically collect information and send this back to the DEX console.
macOS devices
macOS devices please refer to this guide on how to deploy the separate Digital Experience for macOS app. I find the easiest option is to automatically deploy this app using Workspace ONE UEM and the Workspace ONE Admin Assistant for macOS. Then browse the Digital Experience for macOS package and select the included PLIST file.
Omnissa DEX for Windows devices managed by Intune/SCCM and other solutions such as Ivanti, BigFix or Tanium.
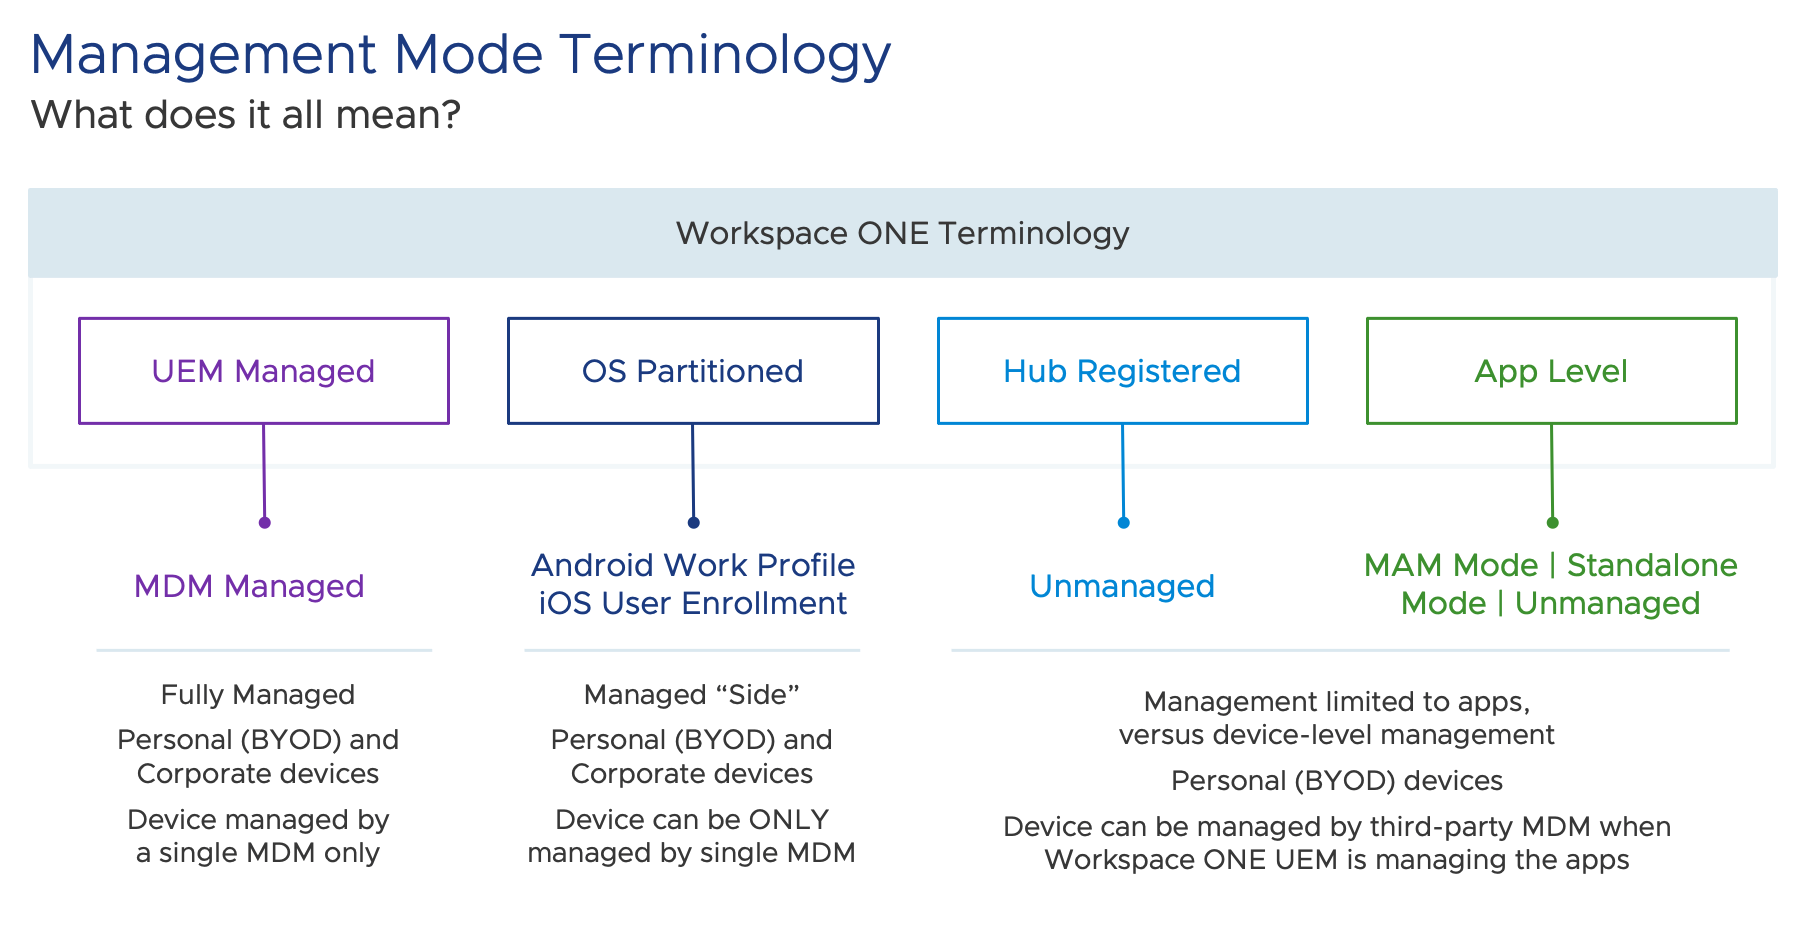
As mentioned above, Omnissa DEX can be deployed to devices managed by a range of 3rd party tools. This requires the Workspace ONE Hub operates in what we term Registered mode vs MDM Managed. This is illustrated in the diagram below from the following Techzone article.
The first step is to login to the Workspace ONE UEM Admin console. Select Groups & Settings – All Settings – Devices & Users – General – Enrollment – Management mode tab. Change Current Setting to Override.
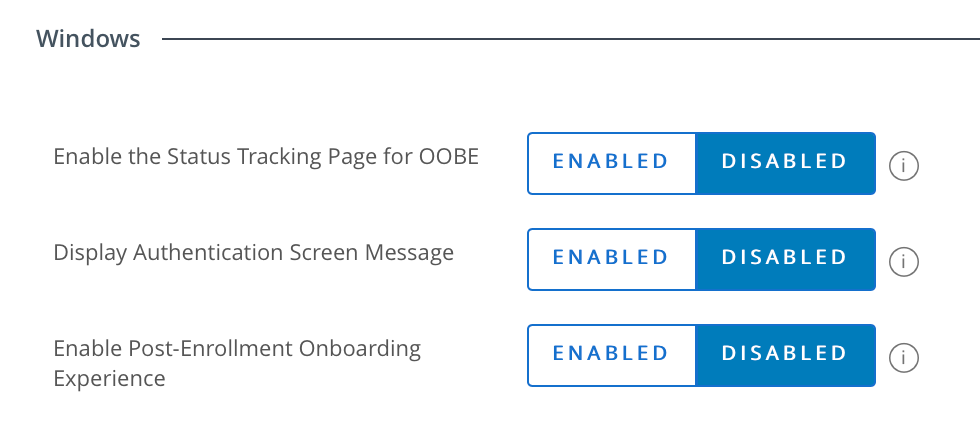
Change Windows to the following settings:

This ensures that all Intelligent Hub endpoints are enrolled without management.
Other applicable Intelligent Hub Settings
We recommend that you apply a number of configurations to the Hub as detailed below:
Fixed Organization Group Setting
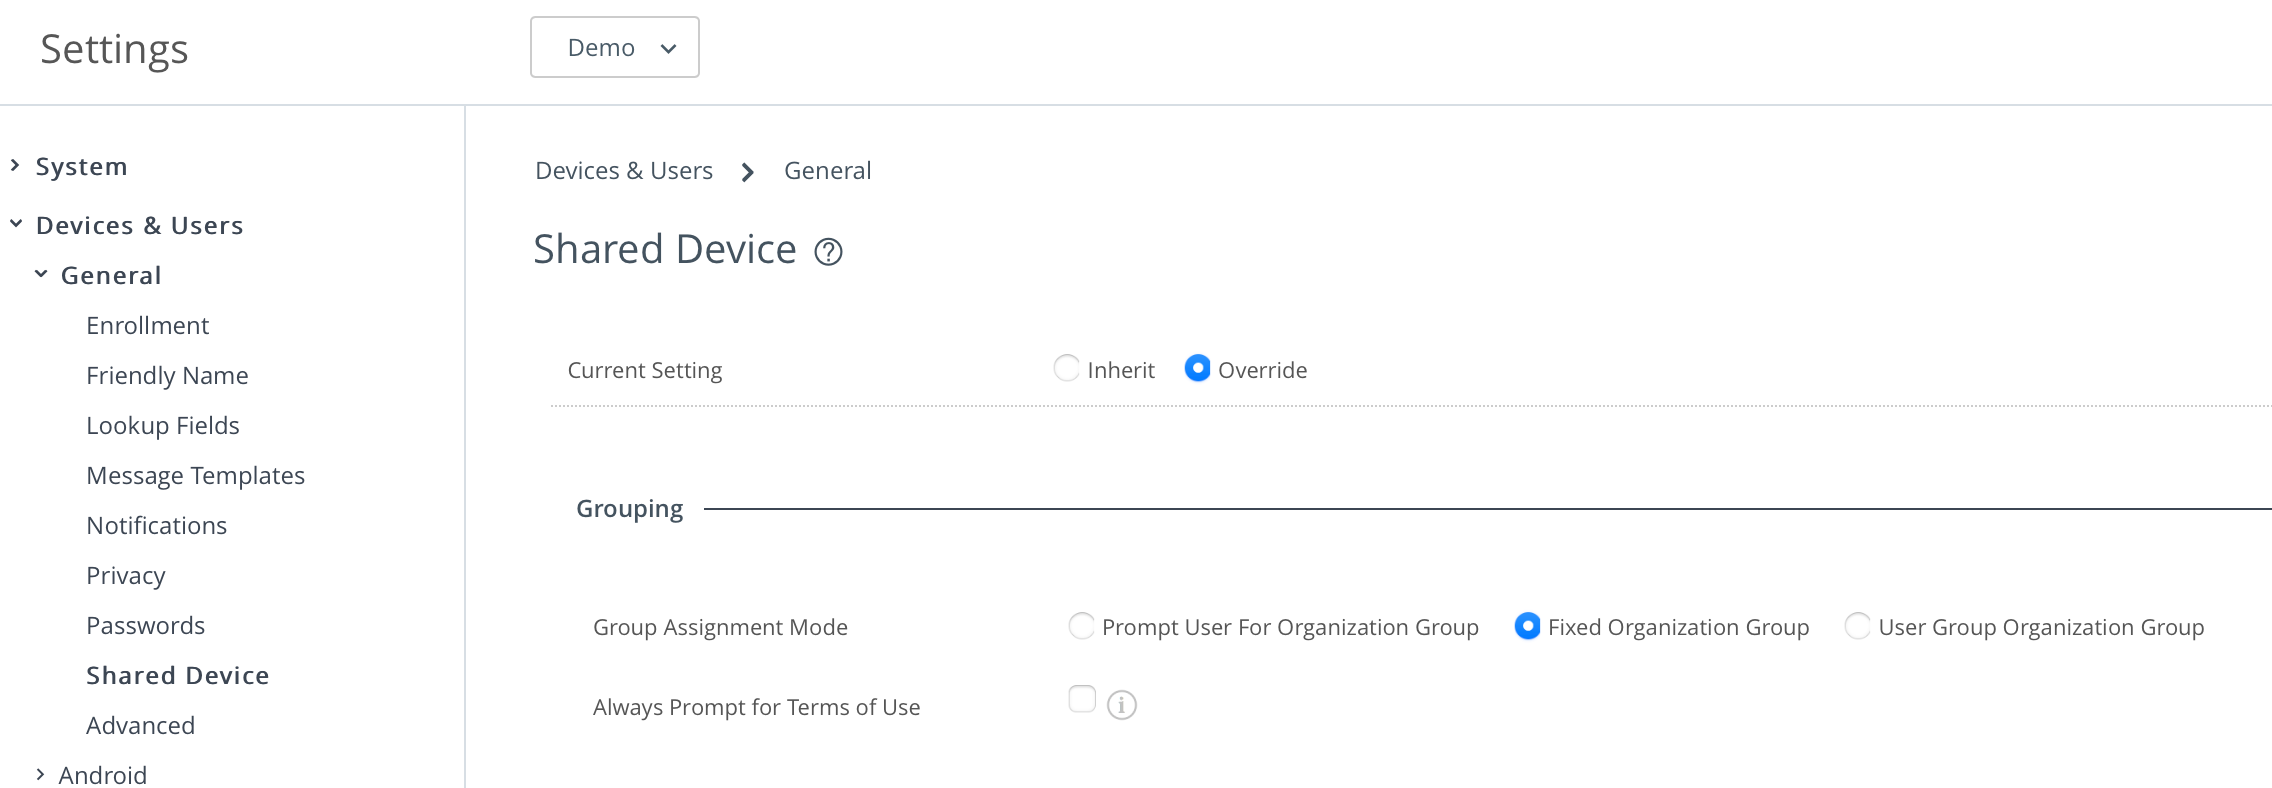
Next, Select Groups & Settings – All Settings – Devices & Users – General – Shared Device. Change Current Setting to Override.
Change Group Assignment Mode to Fixed Organisation Group as shown:
Suppress Optional Prompts
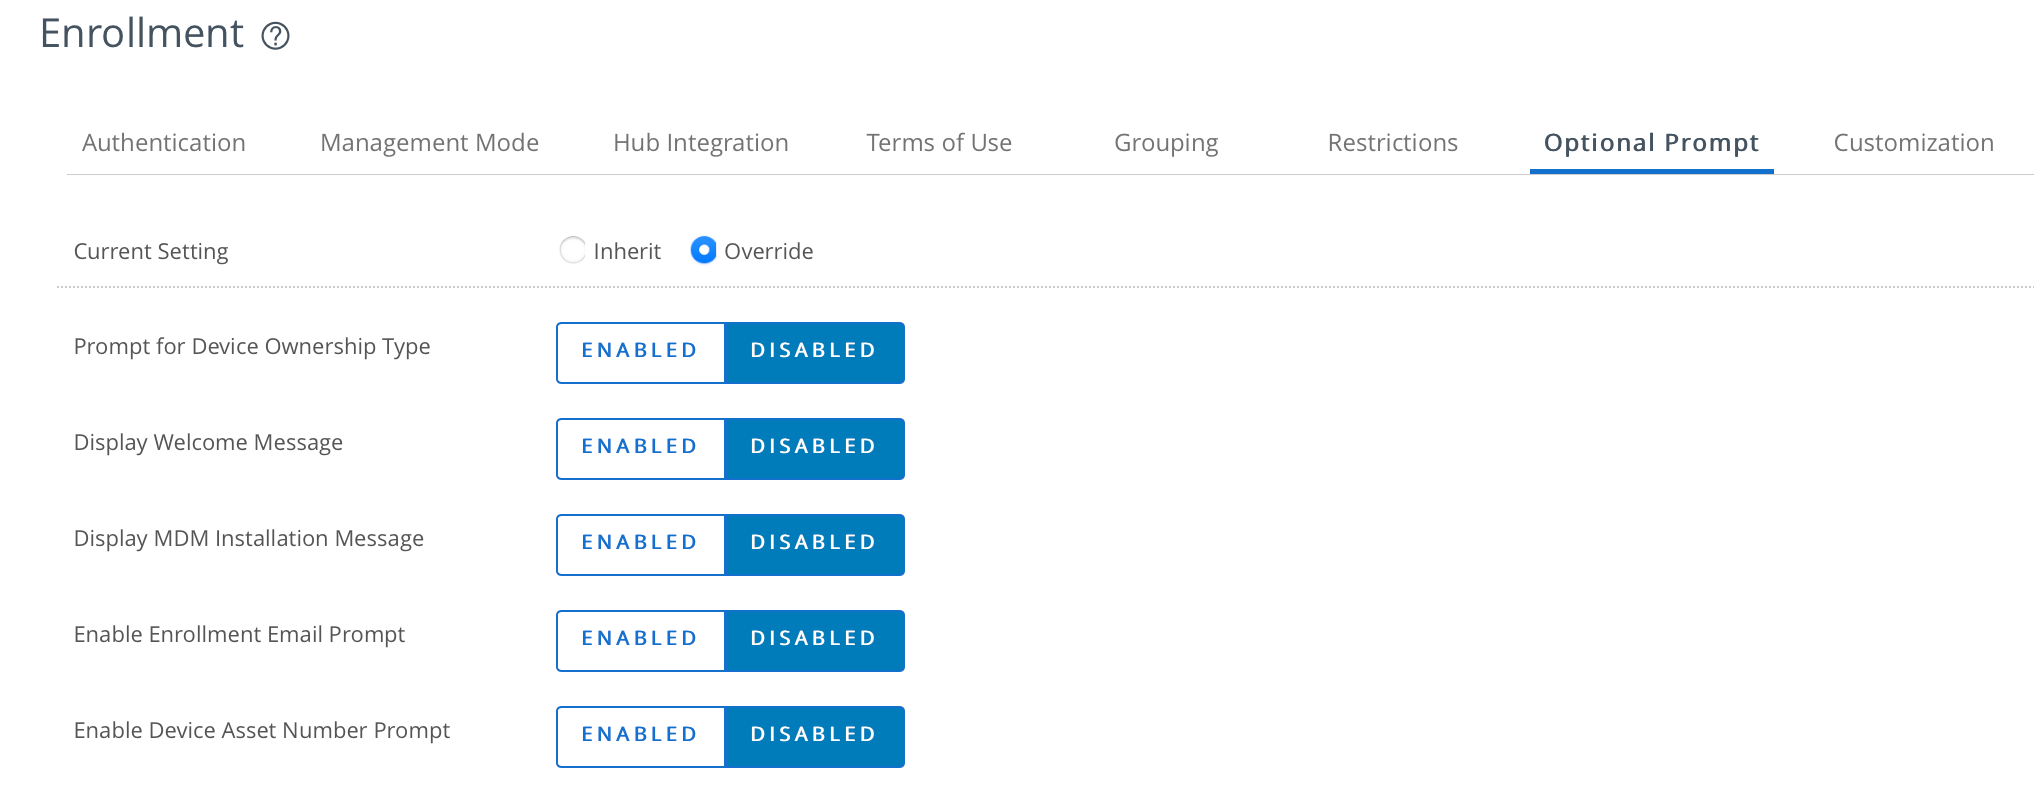
Select Groups & Settings – All Settings – Devices & Users – General – Enrollment – Optional Prompt tab. Change Current Setting to Override.
Ensure the following settings are set to Disabled:
Select Groups & Settings – All Settings – Devices & Users – Windows – Windows Desktop – Intelligent Hub Settings. Scroll down to Privacy. Ensure both Show Privacy Screen and Collect Analytics are set to Disabled.
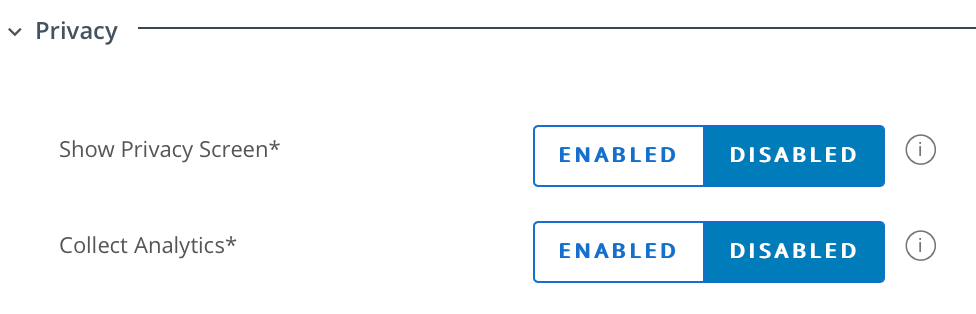
This ensures that the Hub doesn’t start for the user to accept the terms and conditions via the “Want an even better experience” prompt.
Creating a Windows Staging User
Complete the following steps to create a staging user for enrolling the Windows Hub (later steps).
- Navigate to Accounts – Users – List View and select Edit for the user account for which you want to enable device staging.
- In the Add / Edit User page, select the Advanced tab.
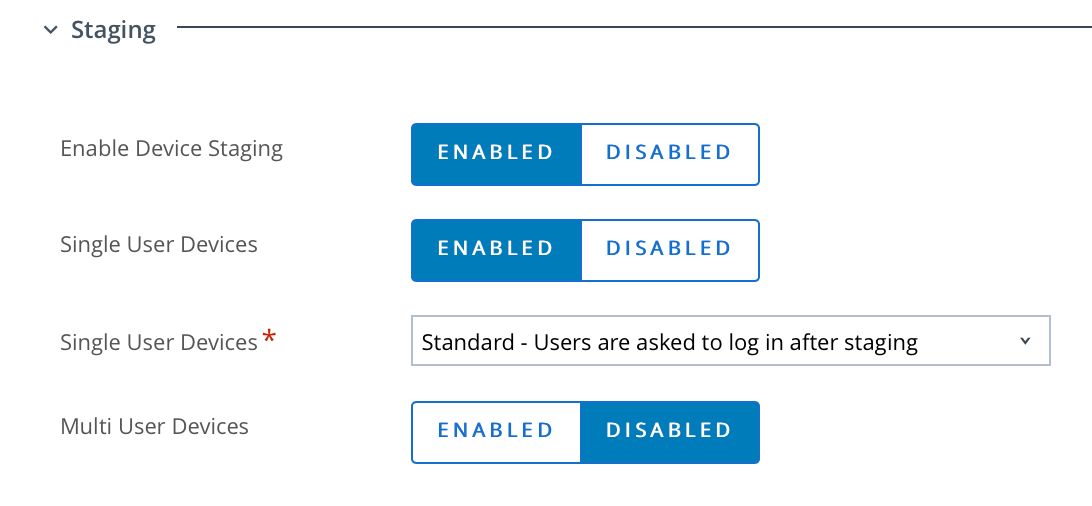
- Scroll down to the Staging section (as shown below)
- For Enable Device Staging, select the Enabled slider. The staging options display.
- For Single User Devices, select the Enabled slider.
- Toggle the type of single user device staging mode to either Standard or Advanced. Set the the option to Standard.
- Ensure that Multi User Devices is set to Deactivated.
Enrolling Windows Intelligent Hub
There are various options to enroll Windows devices into Workspace ONE UEM.
Deploying the Workspace ONE Intelligent Hub via Active Directory GPO
An easy option is to use Active Directory Group Policy (GPO) which deploys the hub MSI and a transform file. I detail the steps how to do this in this blog article.
Intelligent Hub Silent Installation
Alternatively you can leverage existing software distribution tools such as Intune/SCCM, Ivanti, BigFix and Tanium to deploy the Hub silently to your Windows computers which are Active Directory domain joined.
Download the latest version of the hub from www.getws1.com.
Use the following command line to deploy the hub:
msiexec /i “AirwatchAgent.msi” /quiet ENROLL=Y SERVER=ds###.awmdm.com LGName=groupid USERNAME=stagingusername PASSWORD=stagingpassword ASSIGNTOLOGGEDINUSER=Y
Note: enter your appropriate SERVER DS, LGName and USERNAME/PASSWORD for your environment.
Here is the command I entered for my lab:
msiexec /i “AirwatchAgent.msi” /quiet ENROLL=Y SERVER=ds1016.awmdm.com LGName=eucauIntune USERNAME=win10reguser@eucau.com PASSWORD=Passw0rd ASSIGNTOLOGGEDINUSER=Y /L*V “C:\Windows\TEMP\AirwatchAgent.log"
For a complete list of command line options, please see the following article.
Note: If you are registering Azure AD Windows devices which might be managed by Intune, you can still register those Windows computers to Workspace ONE UEM, however the user will be required to sign-in to the Hub with their userid/password. That allows the Hub to switch from the staging user to the appropriate user.
Review Device Registration
Next, review Windows 10/11 devices have been registered by selecting Devices – List View. Ensure that the device shows up as “Hub registered”

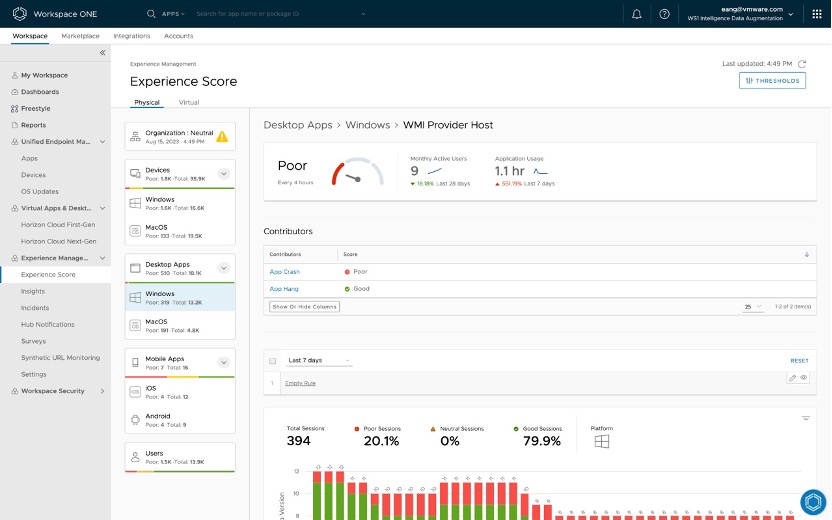
Omnissa DEX Console
It may take up to 4 hours for information to be populated in the console. Now switch to the DEX console:
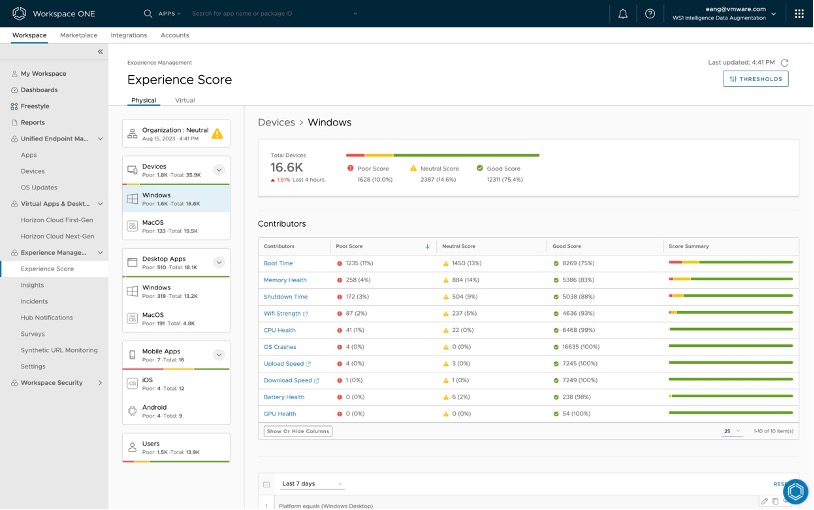
Review the Organisation Score:
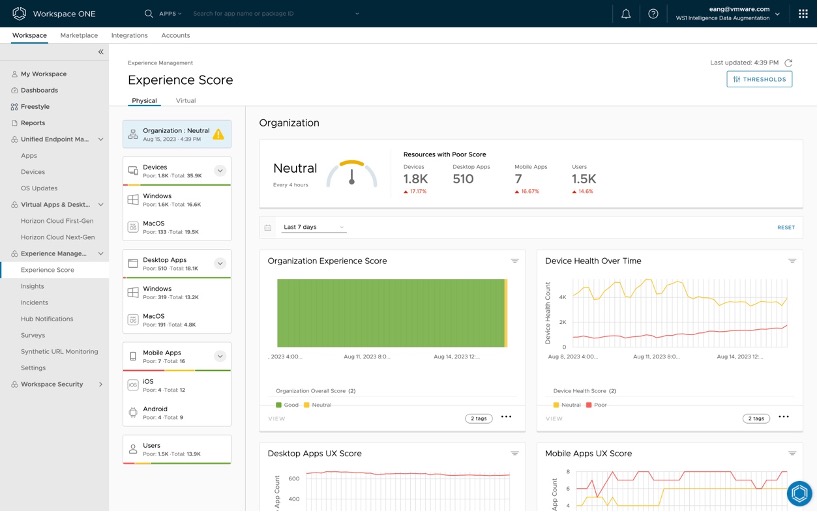
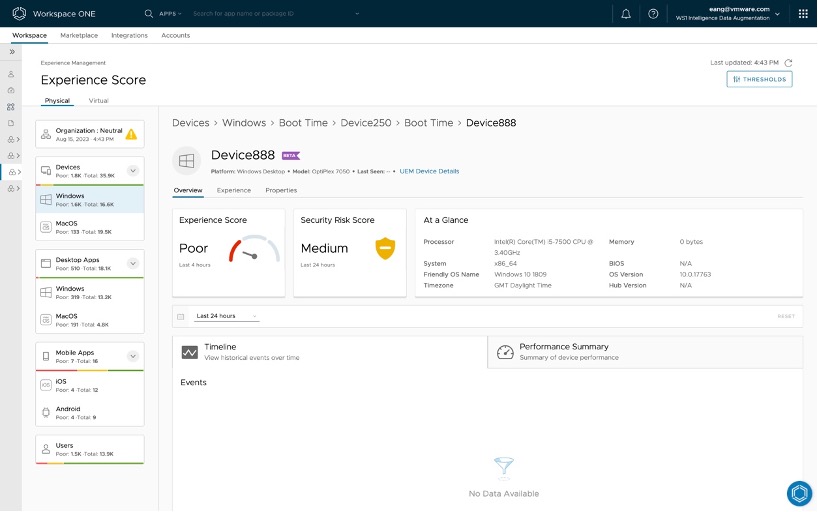
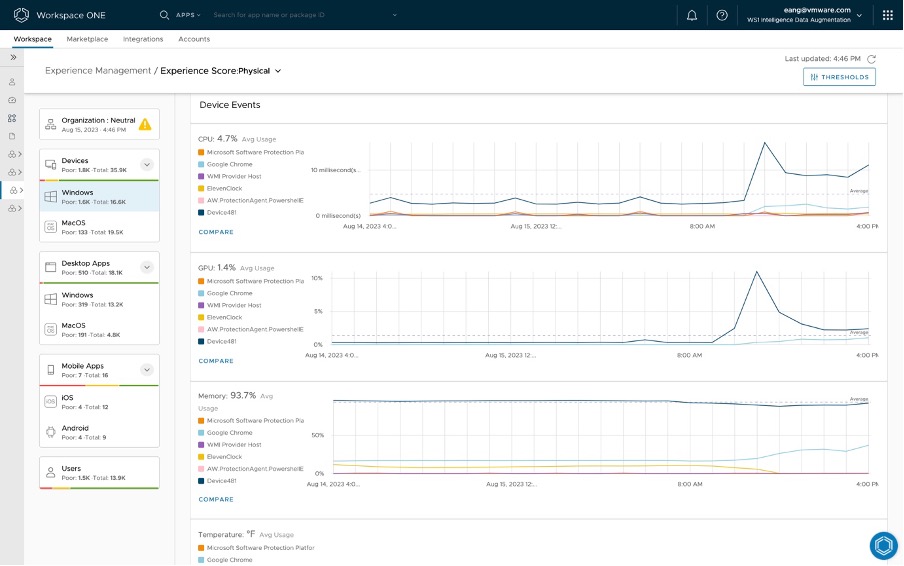
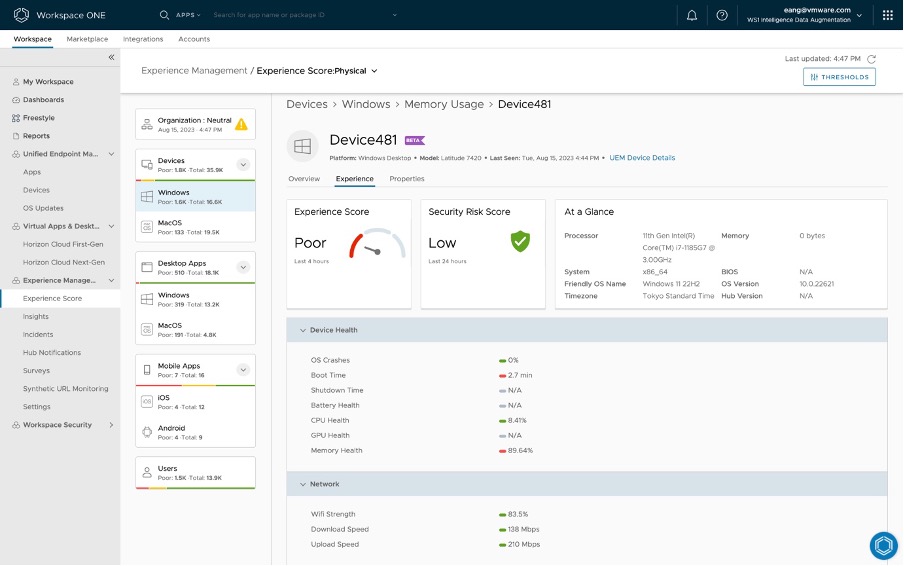
Below are some screenshots of Device Experience Score:
Note the information available on Windows applications:


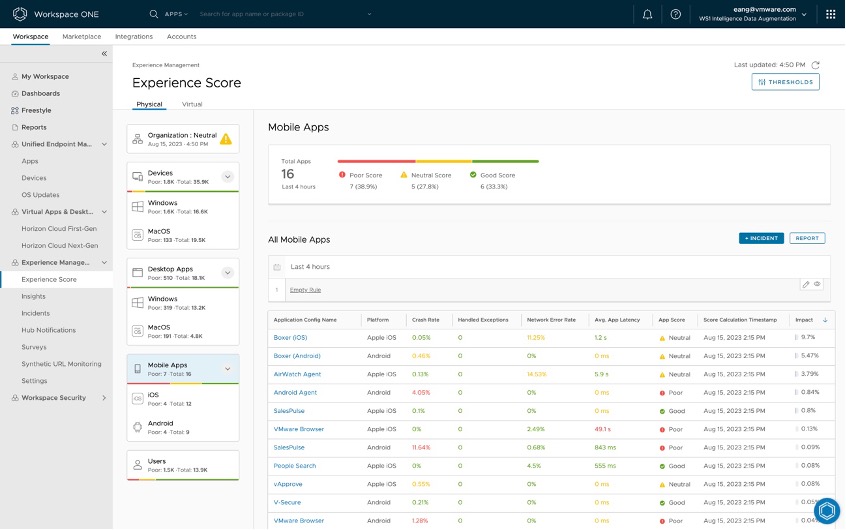
Last but not least, if you have enrolled a mobile device into your Workspace ONE UEM tenant, there is a range of information available on mobile applications (if the Intelligence SDK is incorporated into the application).
Conclusion
In essence, the Workspace ONE Digital Employee Experience (DEX) solution brings advantages to employees, IT personnel, and helpdesk teams. Organizations implementing this solution observe lowered helpdesk expenditures, heightened employee NPS scores, and increased workforce efficiency. Let us know how you go testing this capability in your organisation!
Updates
2 February 2024 – added documentation for disabling Collect Analytics (which otherwise will launch the hub). Plus command line install of the Hub from my lab.
