
Omnissa Identity Services (formerly VMware Identity Services) is a relatively new service that allows organizations to centrally manage their cloud-based identities in Workspace ONE from a single interface. This streamlines the process and reduces the risk of errors. The service uses SCIM to automate the process of adding, updating, and removing user accounts and groups from SCIM 2.0 identity providers such as Okta and EntraID (Azure AD).
With Omnissa Identity Services (OIS) you can now synchronise users and groups from Okta into Workspace ONE UEM and Workspace ONE Access WITHOUT needing an on-premises Active Directory and associated connectors! Essentially this is the option you would use for all cloud native customers.
This article will give you a head start on setting up this integration with Okta.
First off, here are some excellent resources for you to review:
- Start with an overview of Omnissa Identity Services (including videos) by Sacha Warno (Staff Solution Architect)
- The official Omnissa integration documentation is available here (you can refer to this for specific areas such as attribute mapping etc)
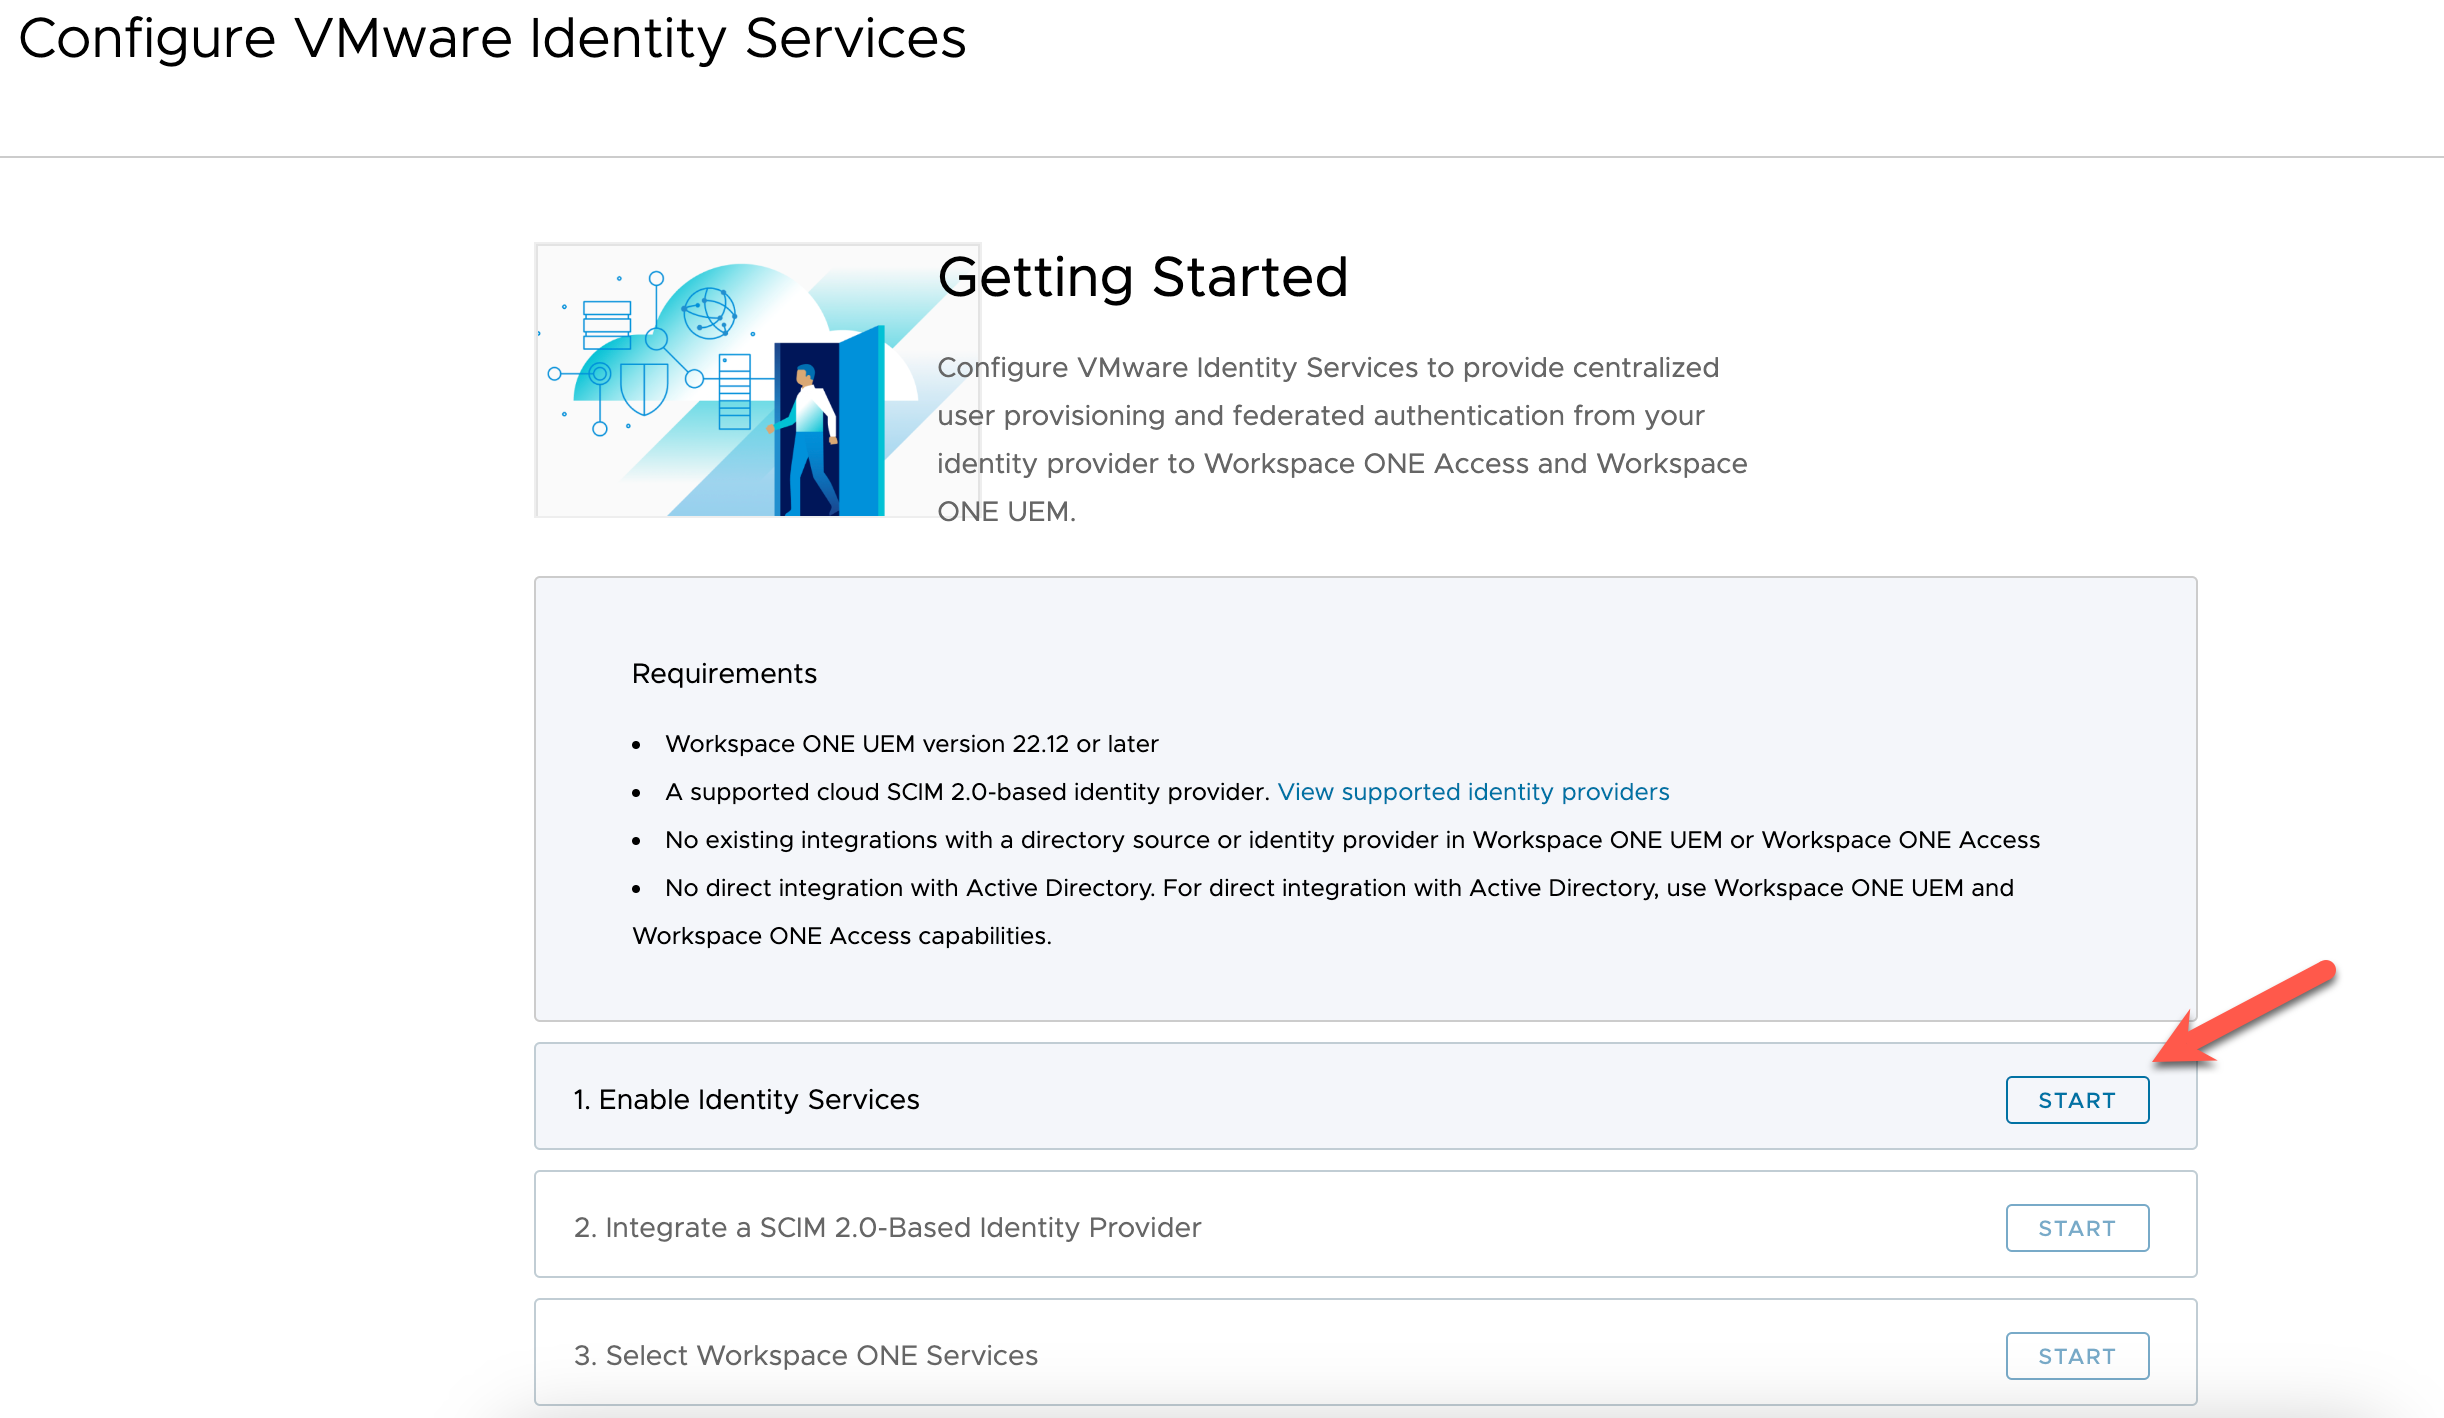
Ok, let’s get started… within the Workspace ONE (Cloud) console select End User Management

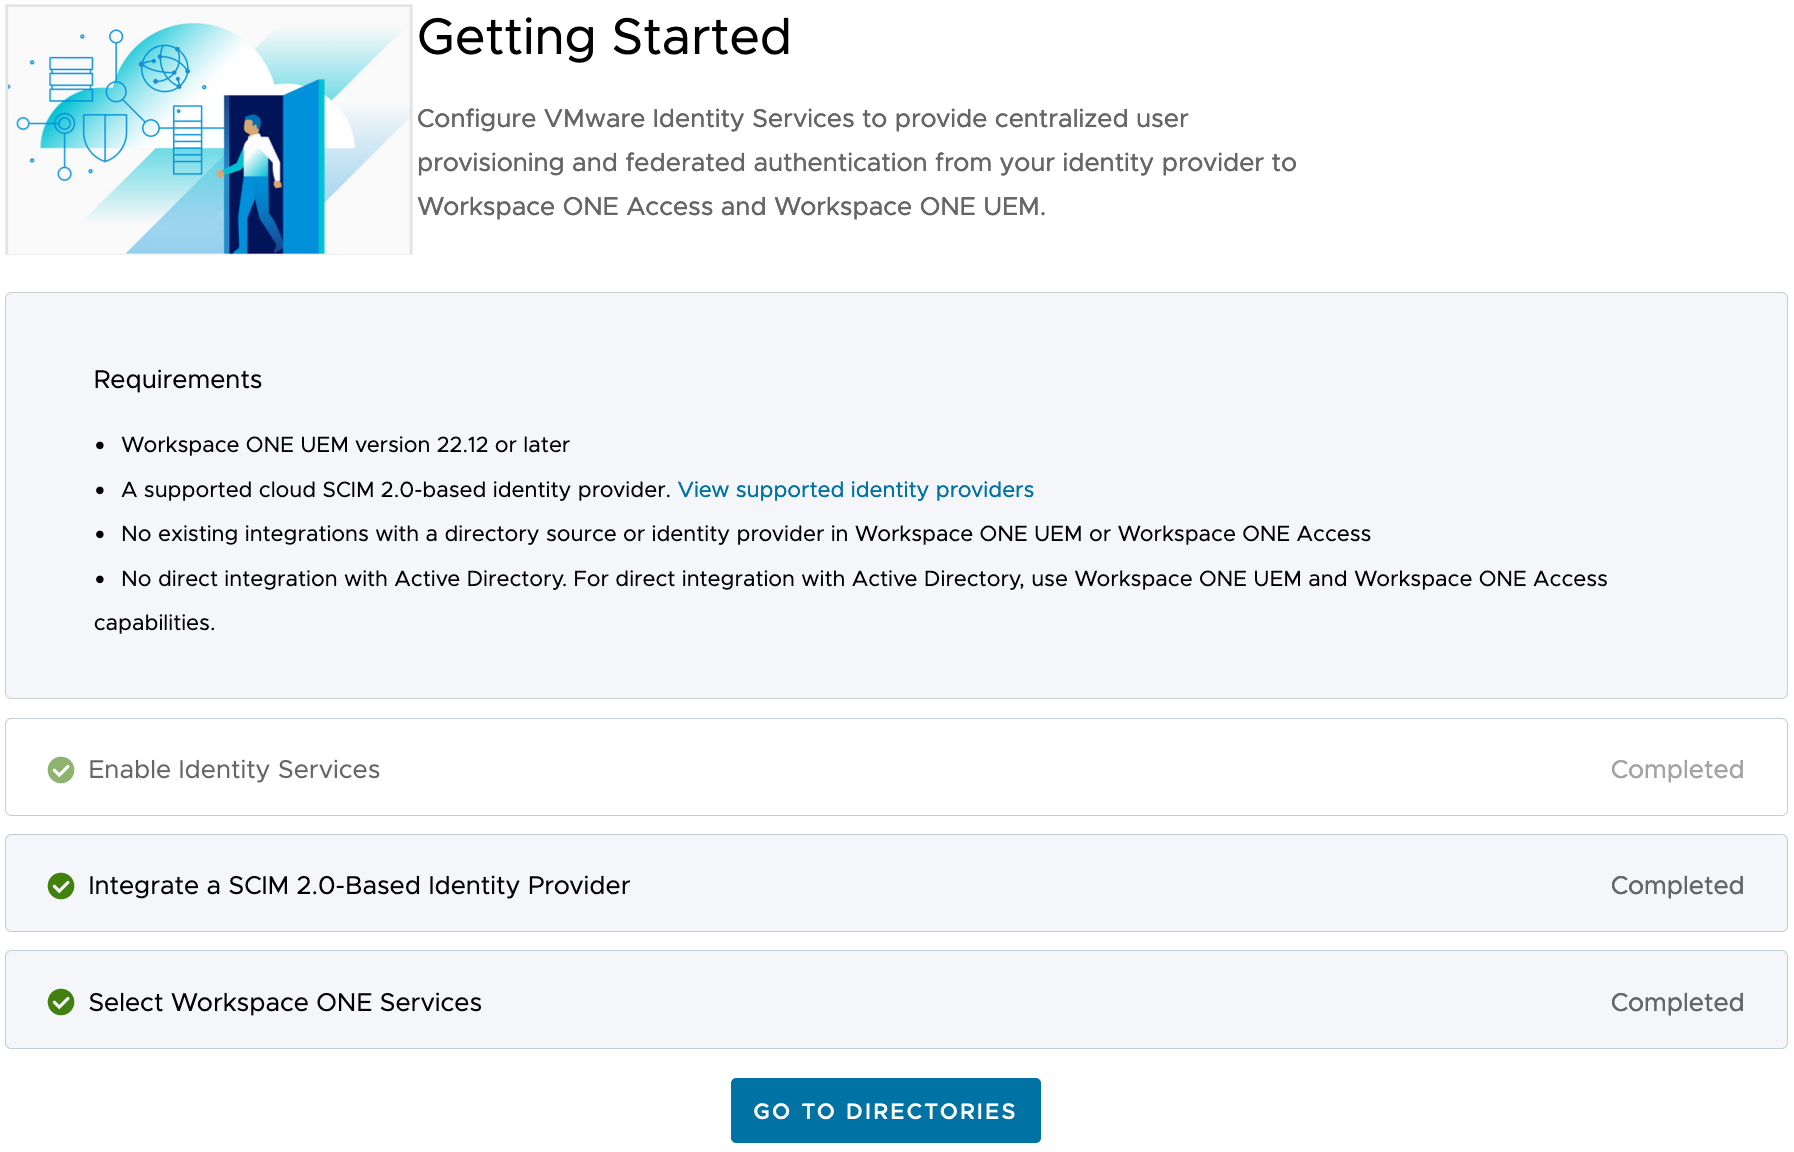
Select Get Started
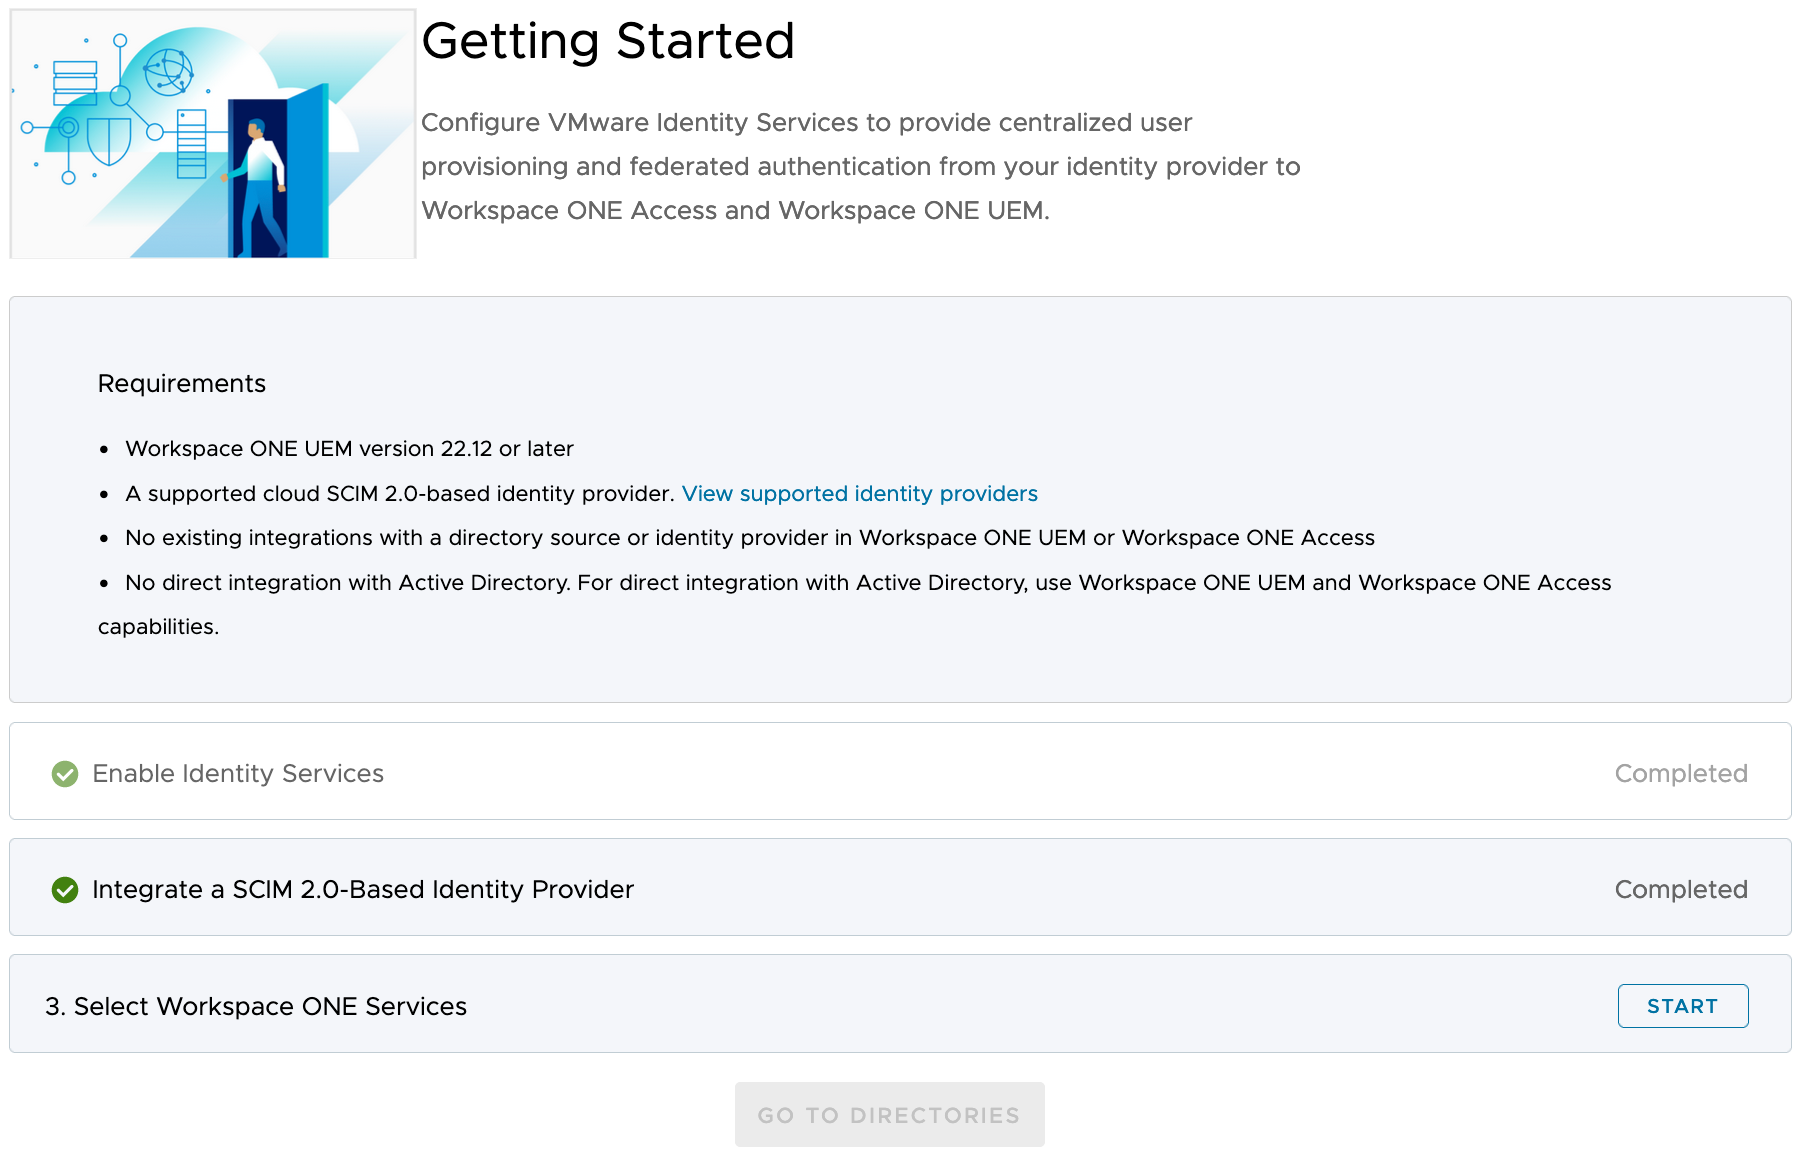
1. Enable Identity Services
To setup Omnissa Identity Services, you’ll complete three configuration sections as shown. Lets begin by clicking on Start as shown.
Review the following message:

Click Enable. Note that once you enable Identity Services, you must contact Omnissa Support to revert this. Click the Enable button.

Note that Omnissa Identity Services is marked as Completed.
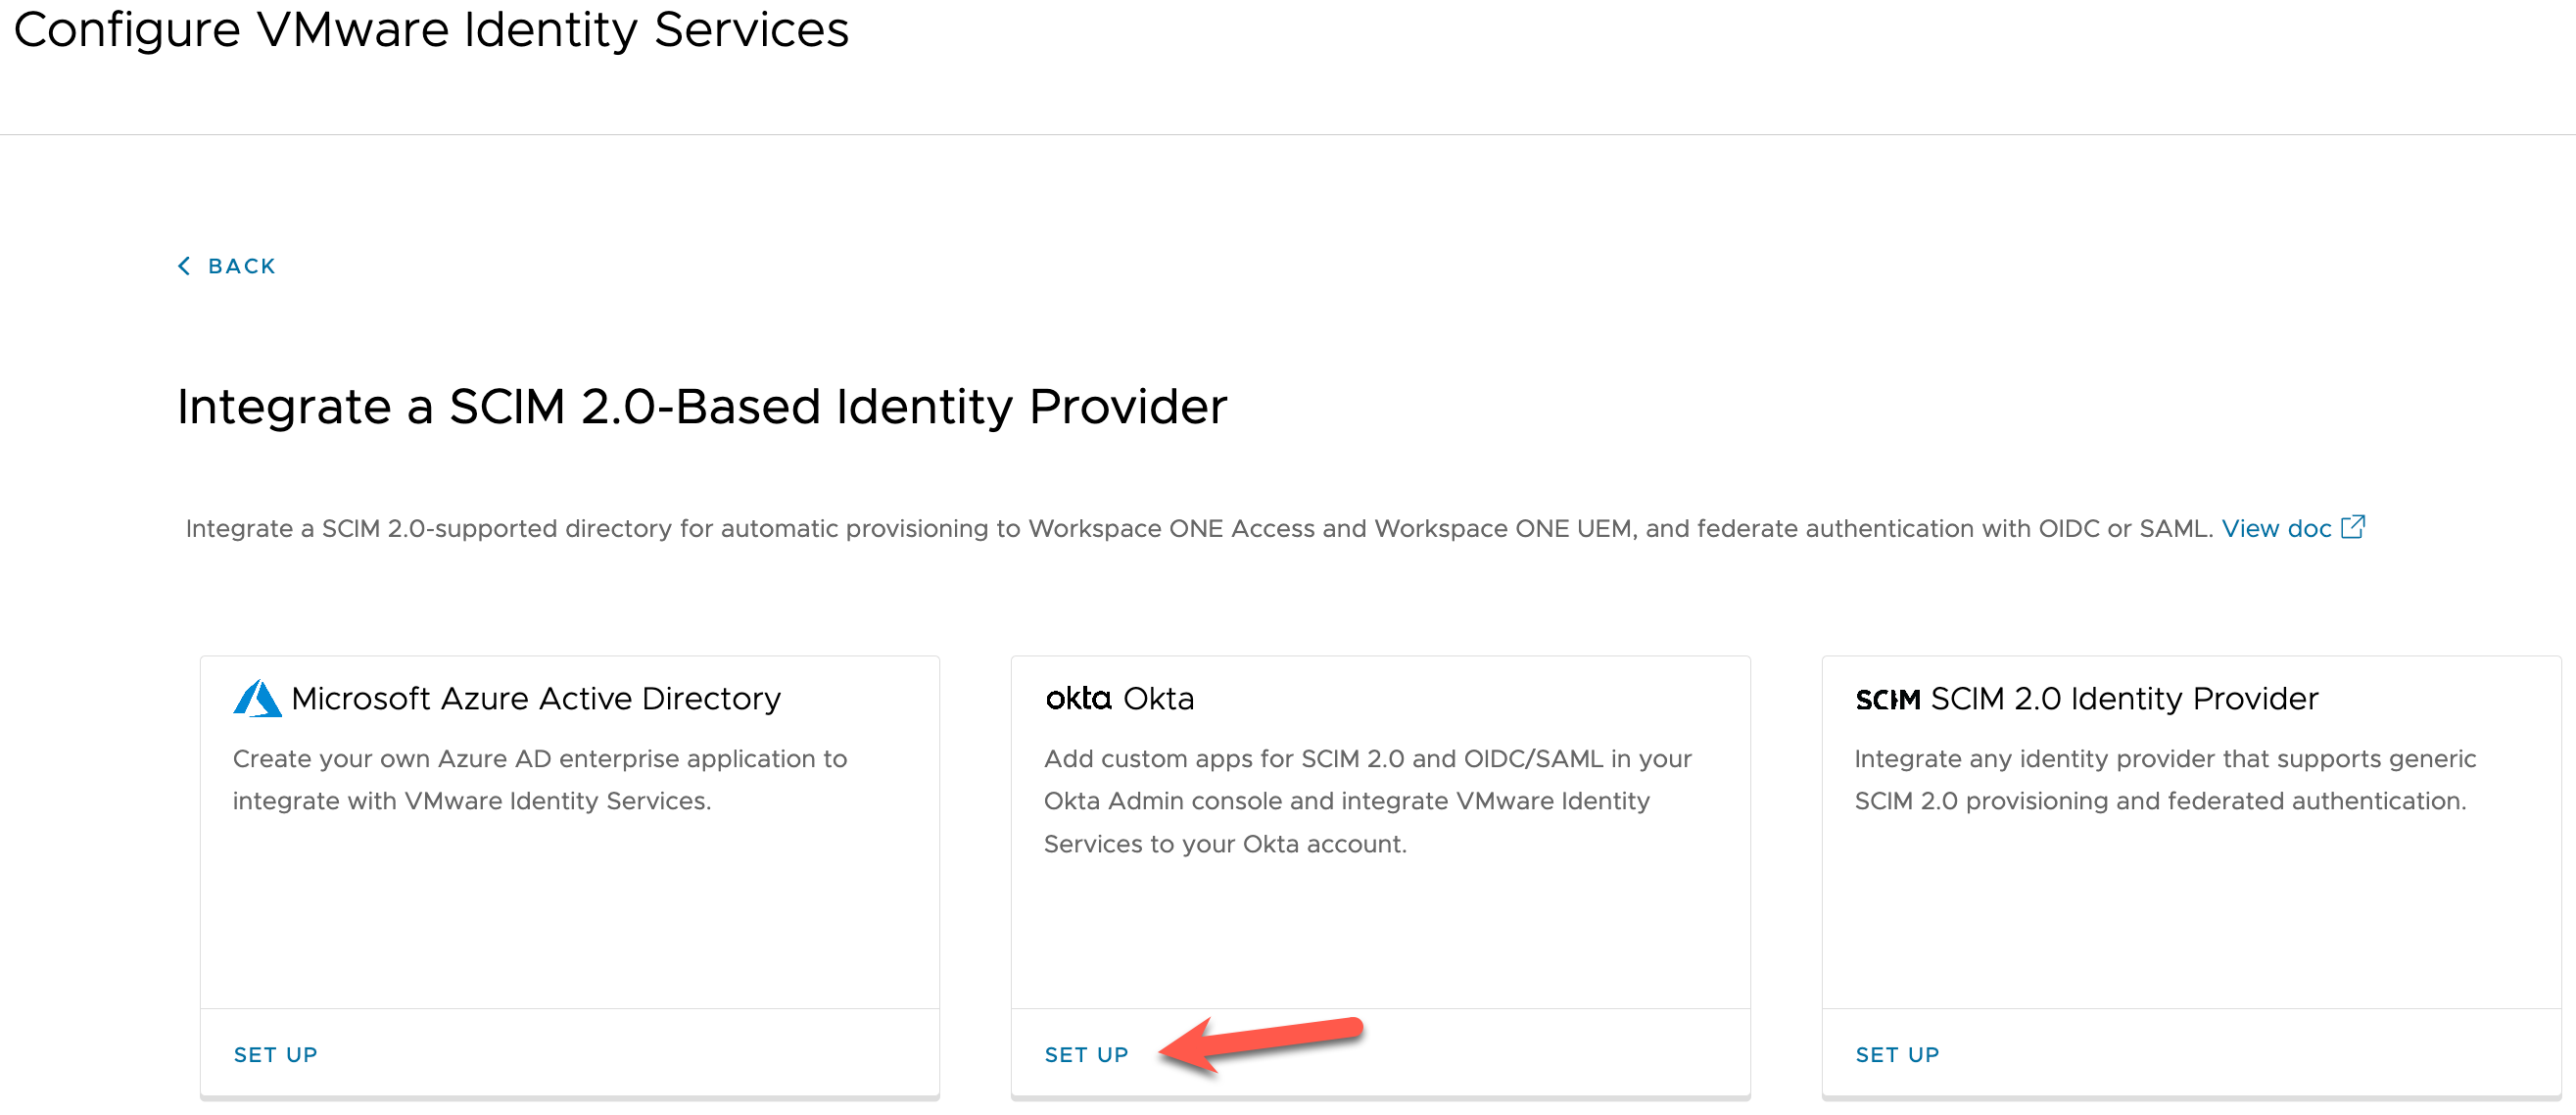
2. Integrate a SCIM 2.0-Based Identity Provider
On step 2, click Start.

On the next screen titled, Integrate a SCIM 2.0-Based Identity Provider next to Okta click Set Up
2.1 General Information
In step 1, General Information of the wizard, enter the Directory Name that you want to use for the provisioned directory in Workspace ONE. The name can have a maximum of 128 characters and only letters, digits, space, hyphen (-) and underscore (_) are allowed.
For Domain Name, enter the primary domain name of your source directory include the extension such as .com or .net. Omnissa Identity Services currently only supports one domain.
For example, for my lab I entered the following:

Click Save. Note the warning and click Save again.

2.2 Configure Identity Provider
In the Workspace ONE console, after creating a directory, review and copy the values generated. The following are details generated for my Lab.

You require these values to configure the provisioning app in Okta.
- Tenant URL: Your Omnissa Identity Services tenant’s SCIM 2.0 endpoint. Copy the value.
- Token Lifespan: The period for which the secret token is valid.By default, Omnissa Identity Services generates the token with a lifespan of six months. To change the token lifespan, click the down arrow, select another option, and click Regenerate to regenerate the token with the new value.
For example, I changed the token lifespan from 6 to 24 months and was shown the following information:

Next we’ll create the provisioning app in Okta.
- Log into the Okta Admin console.
- In the left navigation pane, select Applications > Applications.
- Click Browse App Catalog.
- Search for SCIM 2.0 Test App (OAuth Bearer Token) as shown below.
- In the app page, click Add Integration.

f. In the Add SCIM 2.0 Test App (OAuth Bearer Token) page, in the General Settings tab, enter a name for the app in the Application label text box. For example, Omnissa Identity Services - SCIM.
g. click Next

h. In the Sign-On Options tab, click Done at the bottom of the page.The app page appears.
i. In the app page, select the Provisioning tab.
j. Click Configure API Integration as shown.

k. Select the Enable API integration check box.
l. Complete the Integration section by copying and pasting the information from the Omnissa Identity Services wizard.
- Copy the Tenant URL value from the Omnissa Identity Services wizard and paste it into the SCIM 2.0 Base Url text box in the Okta Admin console.
- Copy the Secret Token value from the Omnissa Identity Services wizard and paste it into the OAuth Bearer Token text box in the Okta Admin console.
Click the Test API Credentials button to test the connection. Make sure you SCIM 2.0 Test App (OAuth Bearer Token) was verified successfully! message before proceeding as shown below within the green box.
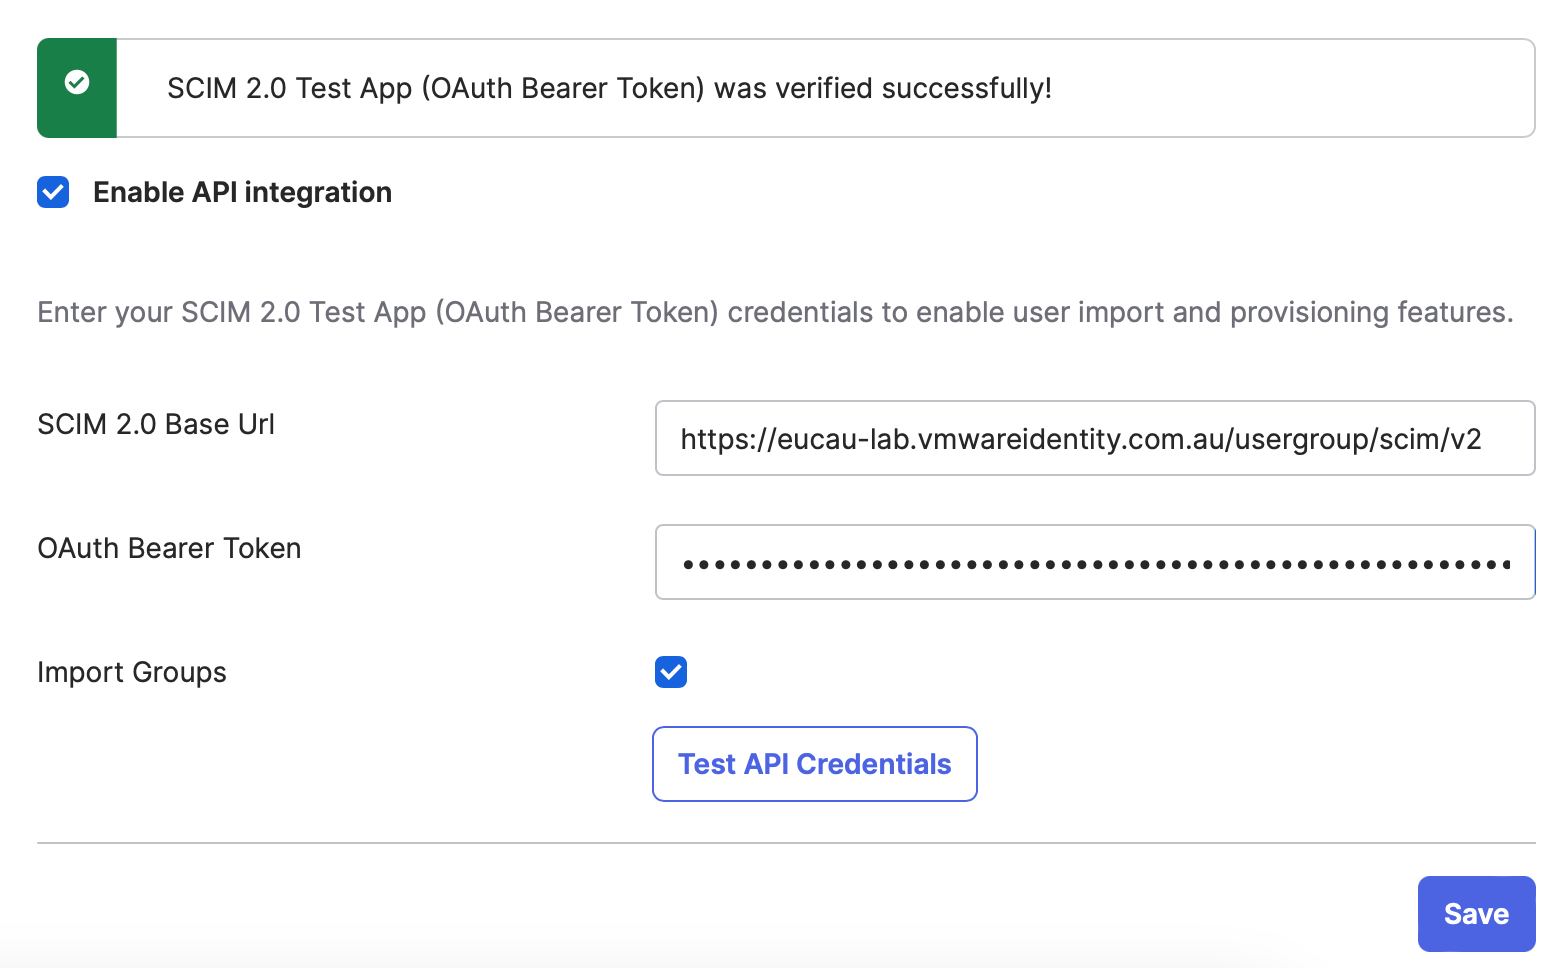
Click Save to continue.
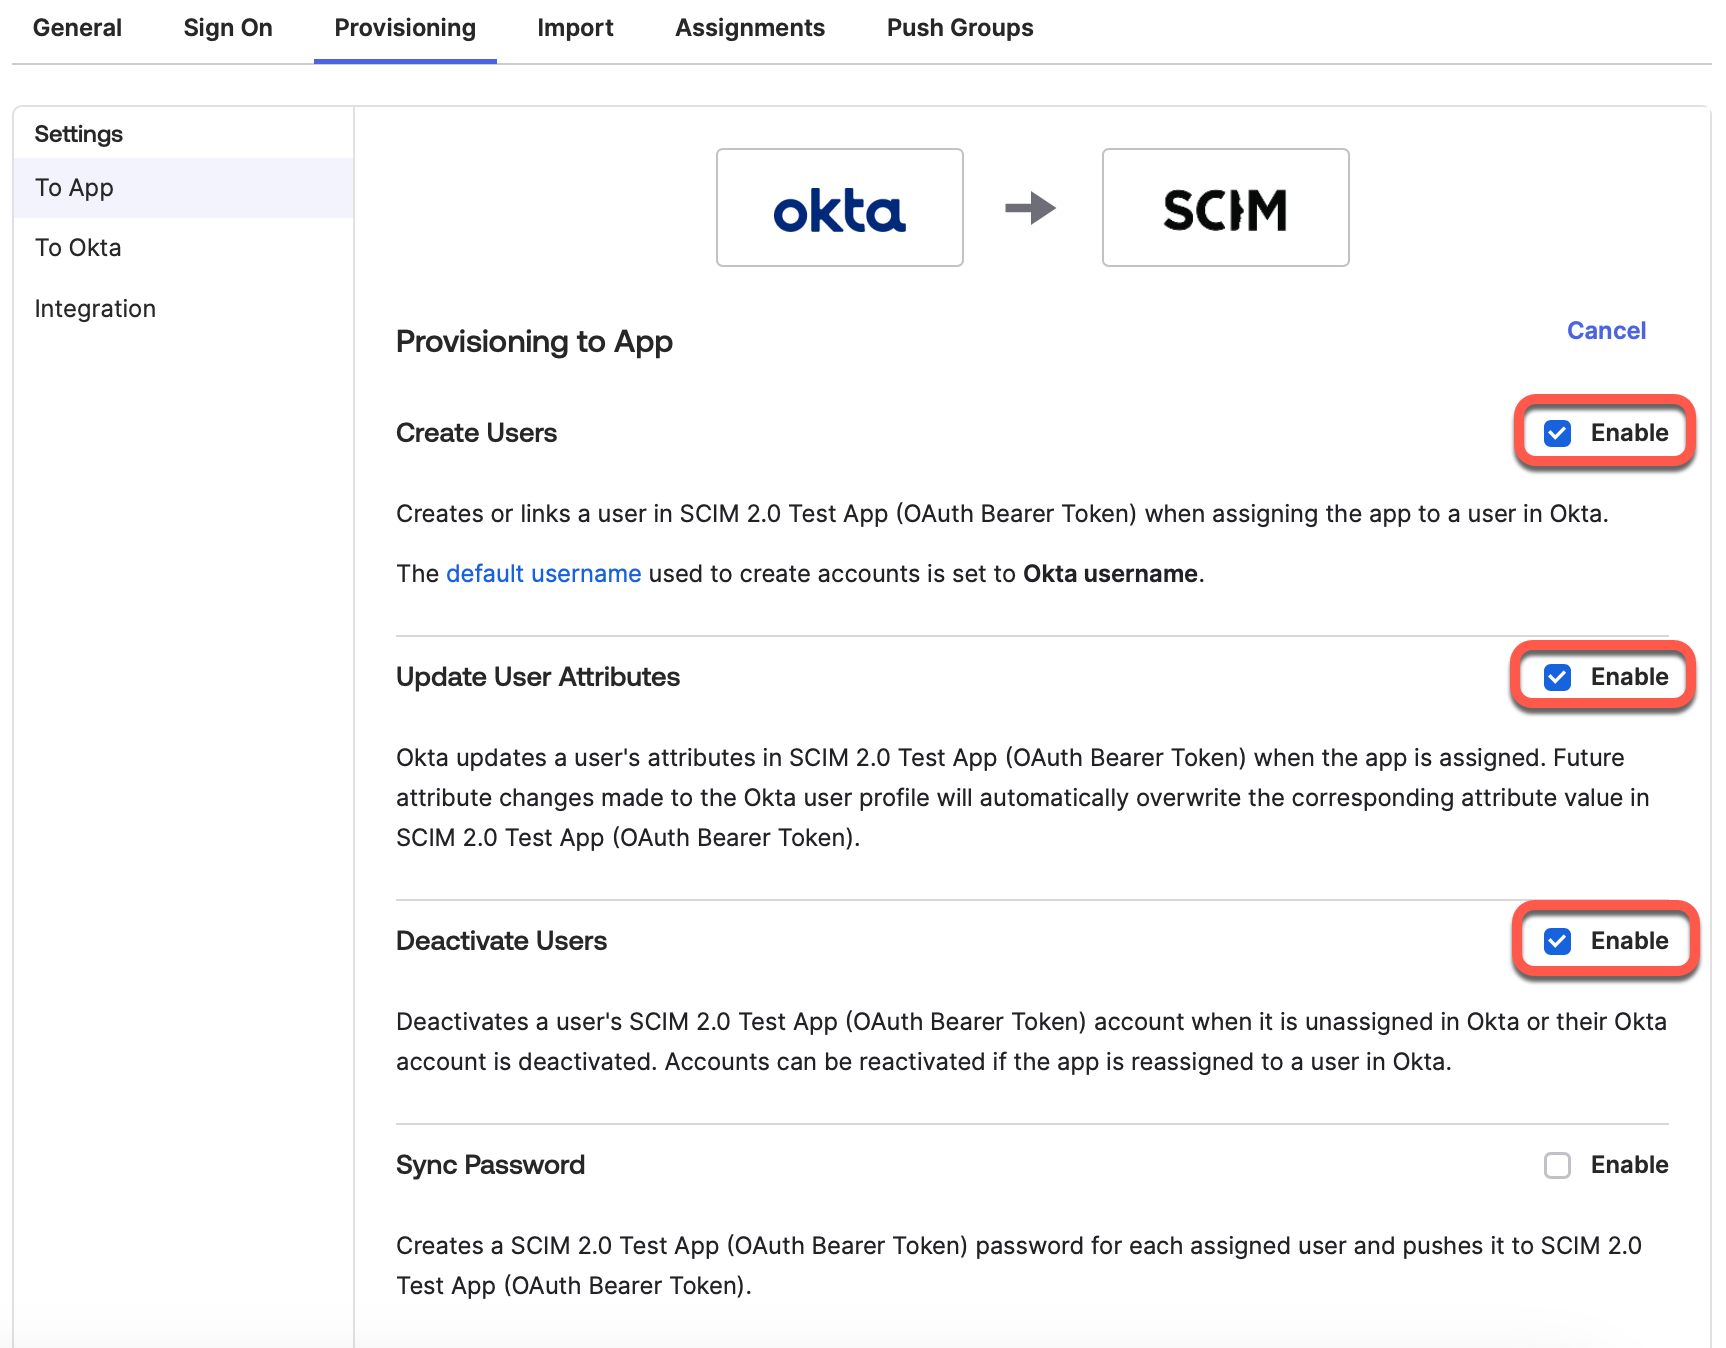
Now within the new application, under the Provisioning tab click Edit and enable the following options:
2.3 Map SCIM User Attributes
Return to the Workspace ONE console to continue with the Omnissa Identity Services wizard. Click Next. Review the list of attributes that will need to be mapped in the Okta SCIM 2.0 application you created in the previous step.

I accepted all of these required (default) attributes, without changing their mapping within the Okta console. For more information about these attributes and their mapping to Workspace ONE attributes, see User Attribute Mapping for Omnissa Identity Services.
Also Sacha explains how to add some custom attributes and map them in the Okta console in his video (mentioned at the start of this article)
Click Next to continue.
2.3 Map SCIM User Attributes
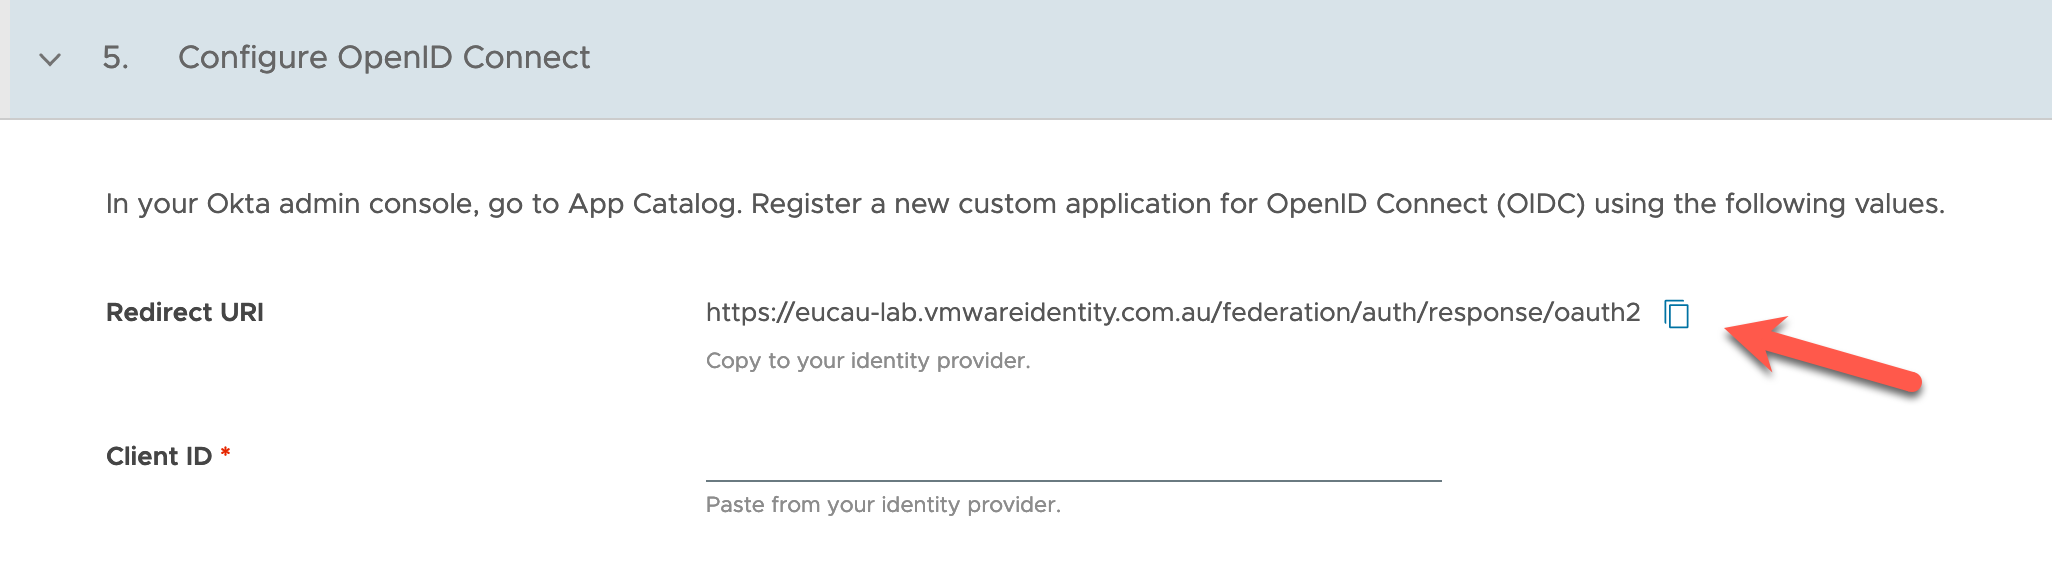
1. Next for Authentication Protocol, select OpenID Connect and click Next

Note: If you select SAML the console mentions UEM check-in/check functionality may not function correctly (I’m asking our engineering team what this means)
2. Copy the Redirect URI by selecting the button shown:
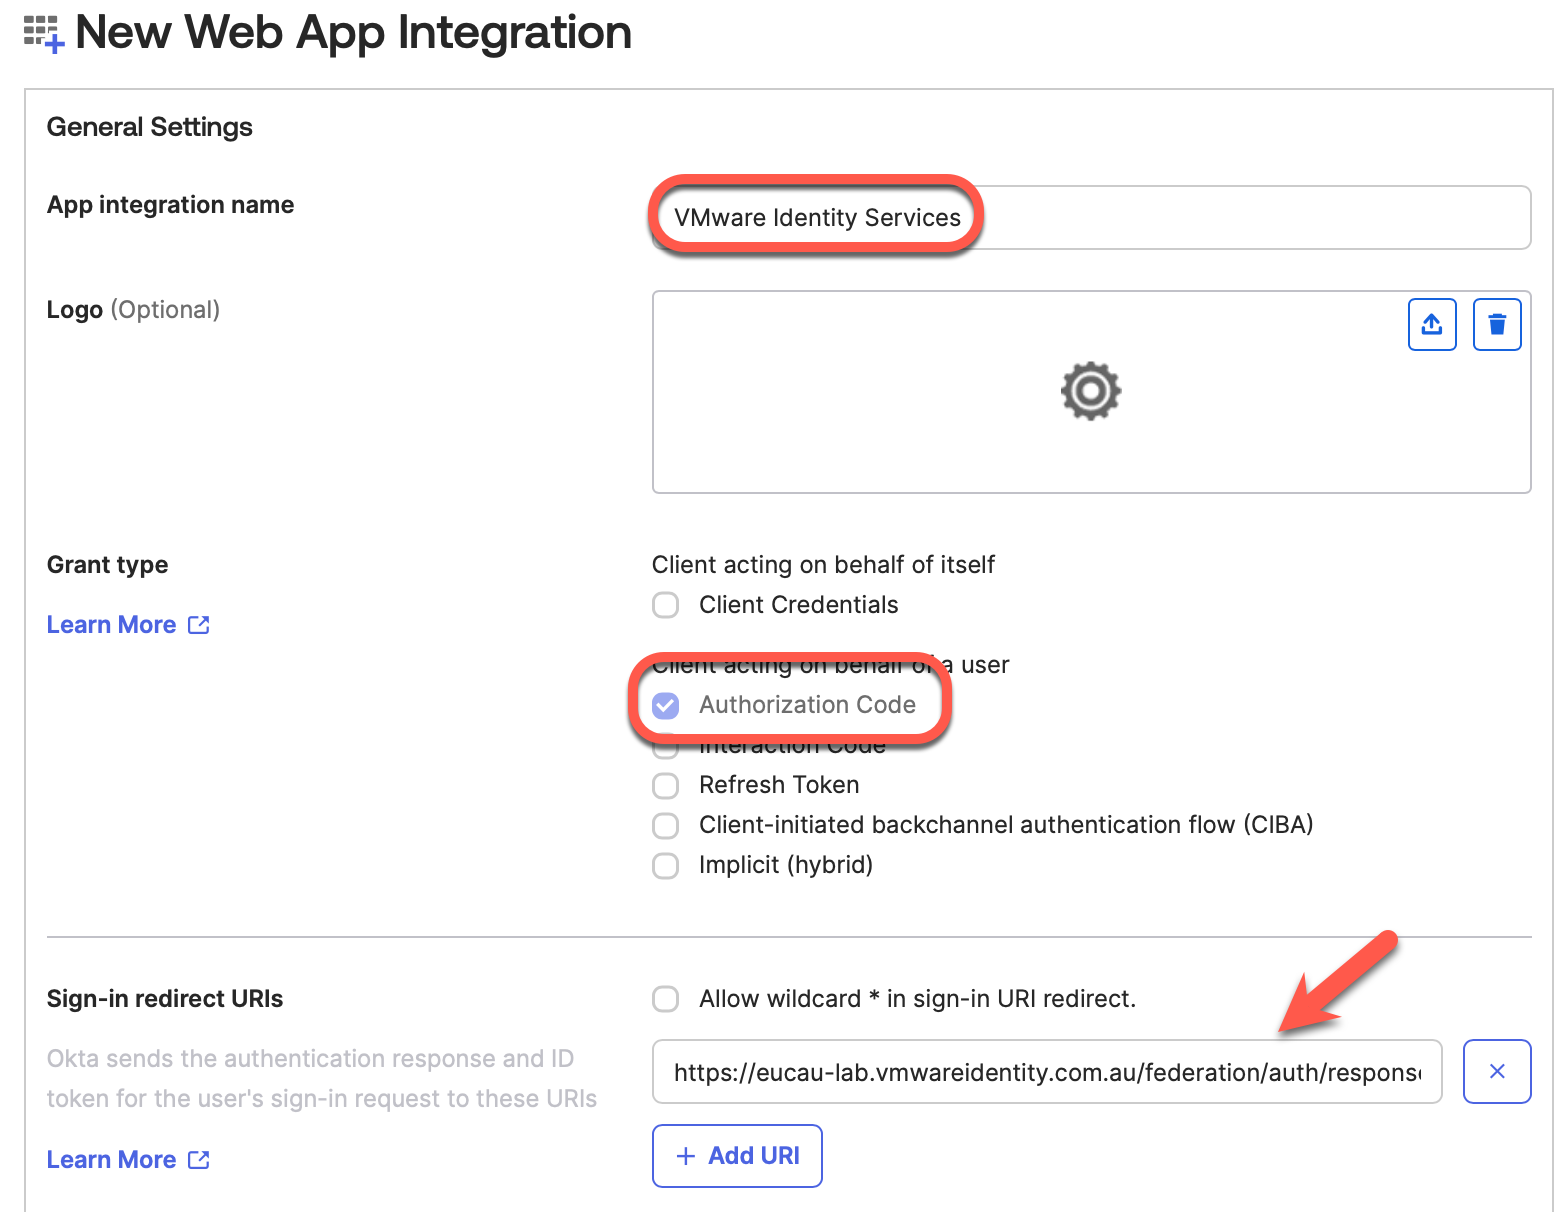
3. In the Okta Admin console, select Applications > Applications in the left pane, then click Create App Integration.
4. In the Create a new app integration window, select OIDC – OpenID Connect.
5. For Application type, select Web Application, then click Next.

6. In the New Web App Integration page, specify the following values:
- App integration name: Enter a name for the app
- Grant type: Select Authorization Code
- Sign-in redirect URIs: Copy and paste the Redirect URI value that you copied from Step 2 (above) of the Omnissa Identity Services wizard.
- Assignments – Controlled Access: You can choose to assign the app to a group now, or make assignments later.
For example:

Scroll down and click Save.
Find the client ID and client secret of the Okta OpenID Connect app
Select the General tab.
Find the Client ID and Client Secret values
Select the General tab.
Find the Client ID and Client Secret values as shown below. You will use these values in the next step.

You will use these values in the next step.
Return to the Omnissa Identity Services wizard in the Workspace ONE console, and complete the configuration in the Configure OpenID Connect section.
| Client ID | Copy and paste the Client ID value from the Okta OpenID Connect app. |
| Client Secret | Copy and paste the client secret value from the Okta OpenID Connect app. |
| Configuration URL | Copy and paste the OpenID Connect well-known configuration URL of the Okta app. For example: https://yourOktaOrg/.well-known/openid-configuration For my environment this was: https://eucau.okta.com/.well-known/openid-configuration |
| OIDC User Identifier Attribute | Specify the OpenID Connect attribute to map to the Workspace ONE attribute for user lookups I left the default value: email |
| Workspace ONE User Identifier Attribute | Specify the Workspace ONE attribute to map to the OpenID Connect attribute for user lookups. I left the default value: email |
For example:

Click Finish. You should then be shown a completed setup of Omnissa Identity Services:
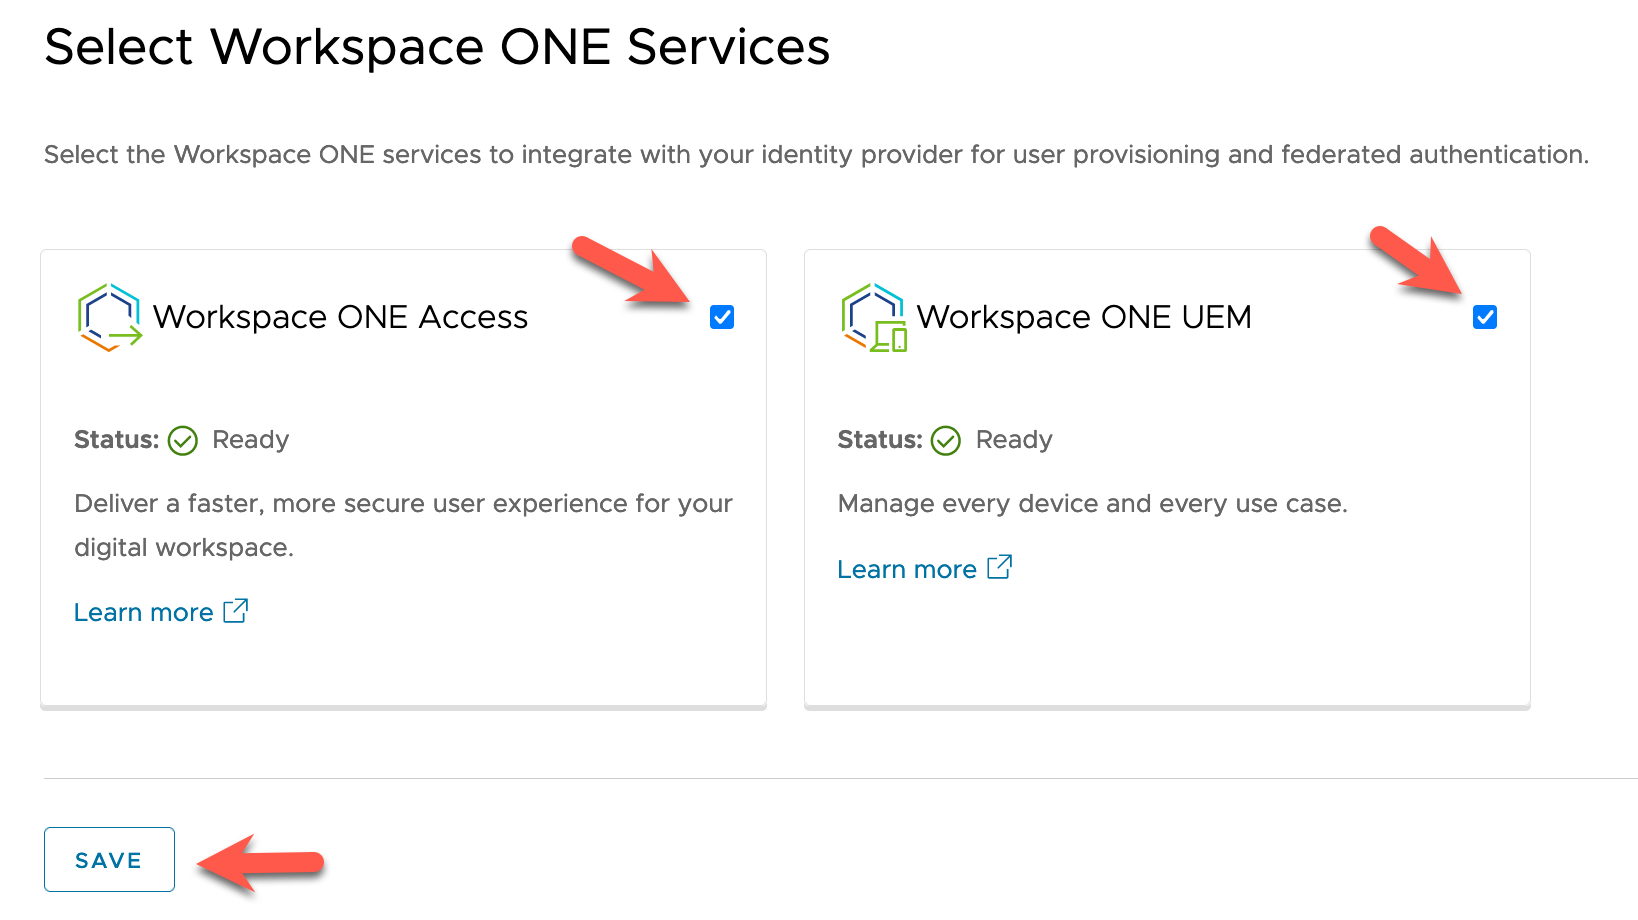
Click Start. Next select the Workspace ONE services to integrate with Okta. I selected both Workspace ONE Access and Workspace ONE UEM as shown. Click Save.
Note the following warning message, then click Save.

The integration is now complete! Now click Go To Directories to continue.
3. Provisioning Users to Workspace ONE
After you complete the Omnissa Identity Services wizard, we’ll now provision users from Okta to Workspace ONE. For my lab, I first selected a couple of test users first. Then moved to selecting a group with larger numbers of users.
3.1 Adding Users
Go to the Omnissa Identity Services – SCIM application – Assignments tab. Select Assign and select a number of test users (as shown)

Within the Workspace ONE console, when you return to the End User Management section and select Users they should be listed as shown.
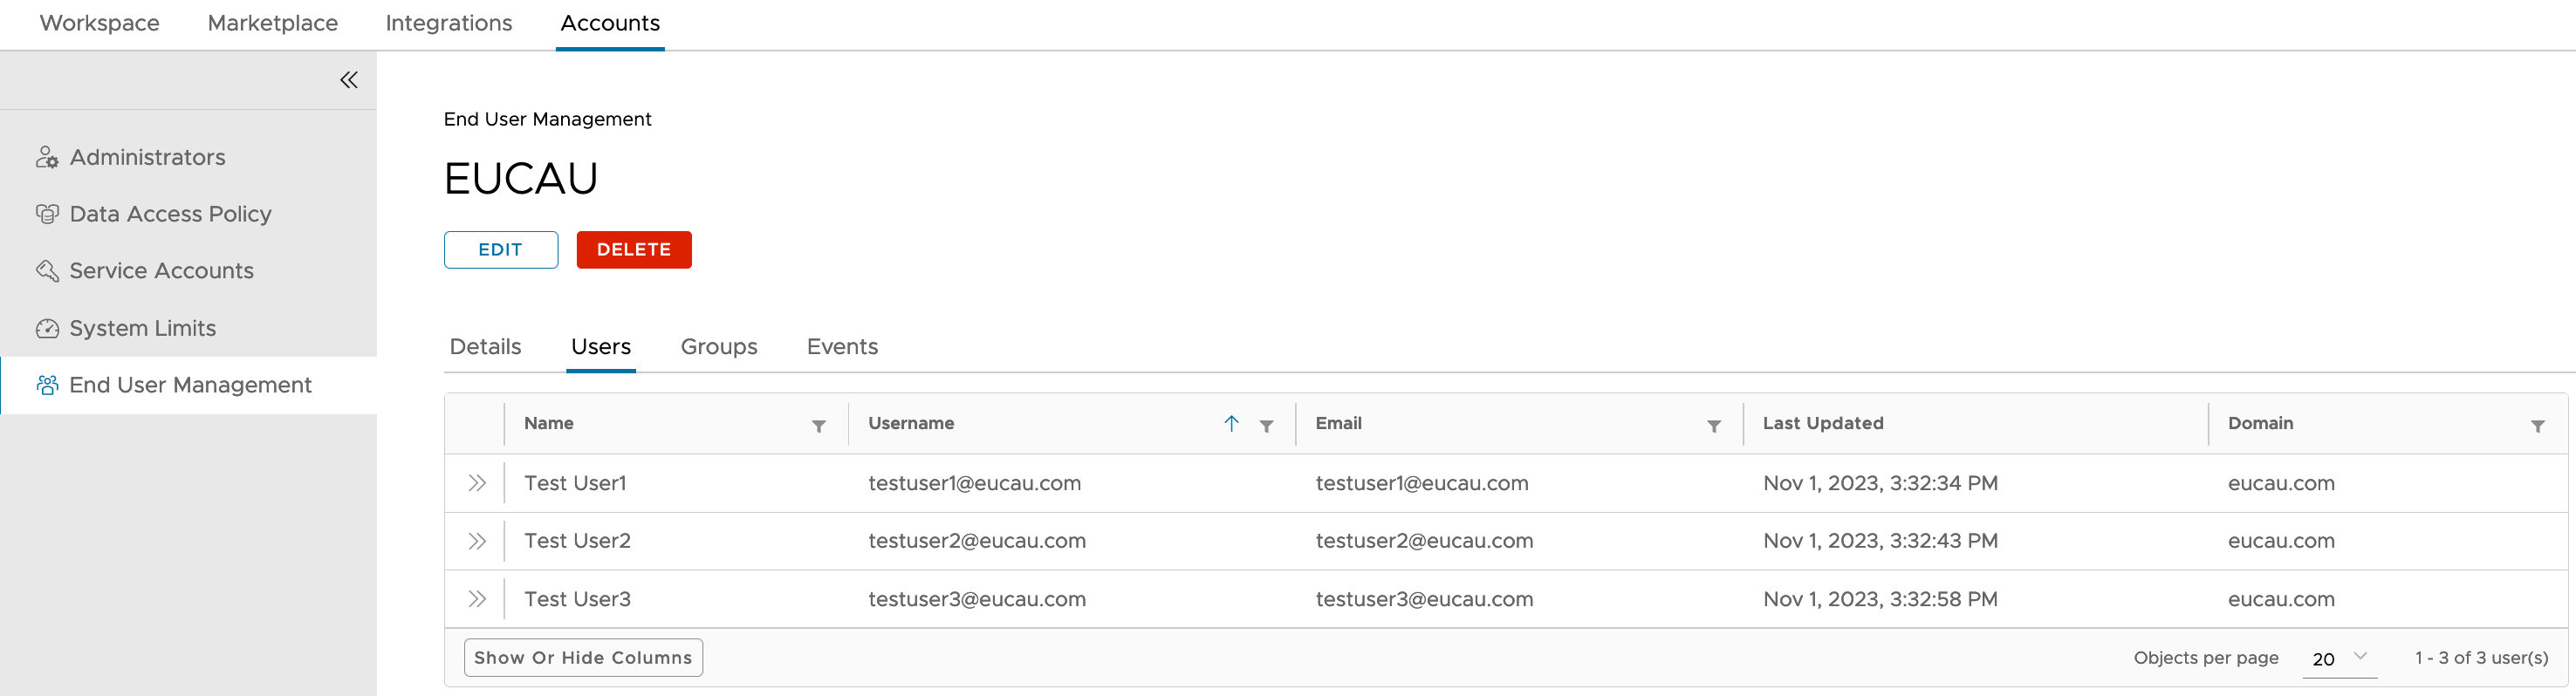
The corresponding users in Workspace ONE UEM are shown as follows:

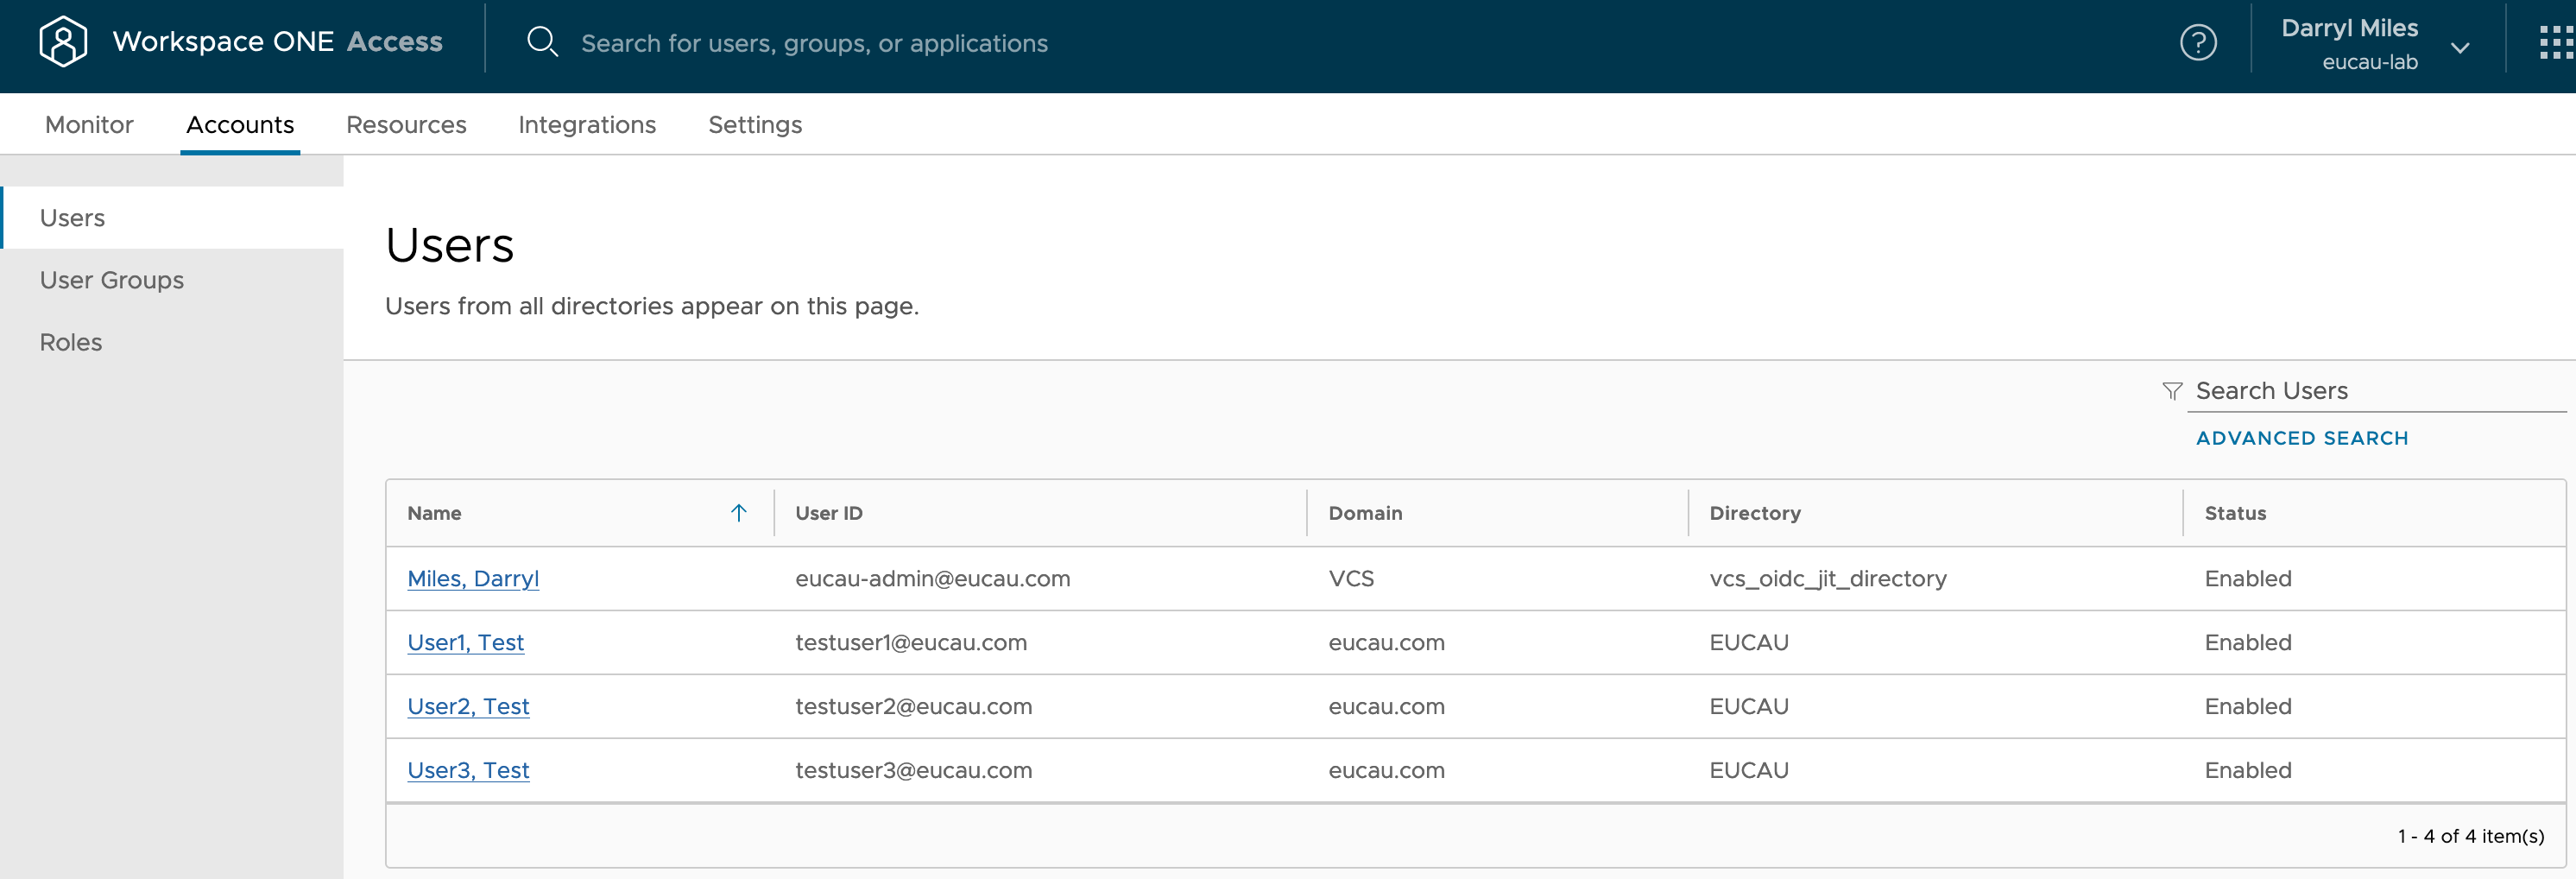
Similarly, in Workspace ONE Access as follows:
3.1 Adding Groups (of Users)
Adding individual users of course isn’t practical. In the Okta Admin console, navigate to the Assignments tab again. Select Assign – Assign to Groups.
Click Assign next to the group name, then click Save and Go Back.
Assign the app to other groups, then click Done.
For example:

Select the Push Groups tab.
Select Push Groups > Find groups by name.
Enter the name of the group in the search box and select the group from the results.
Make sure Push group memberships immediately is selected, and click Save.
Verify that the group status changes to Active, which indicates that the group has been pushed. For example:

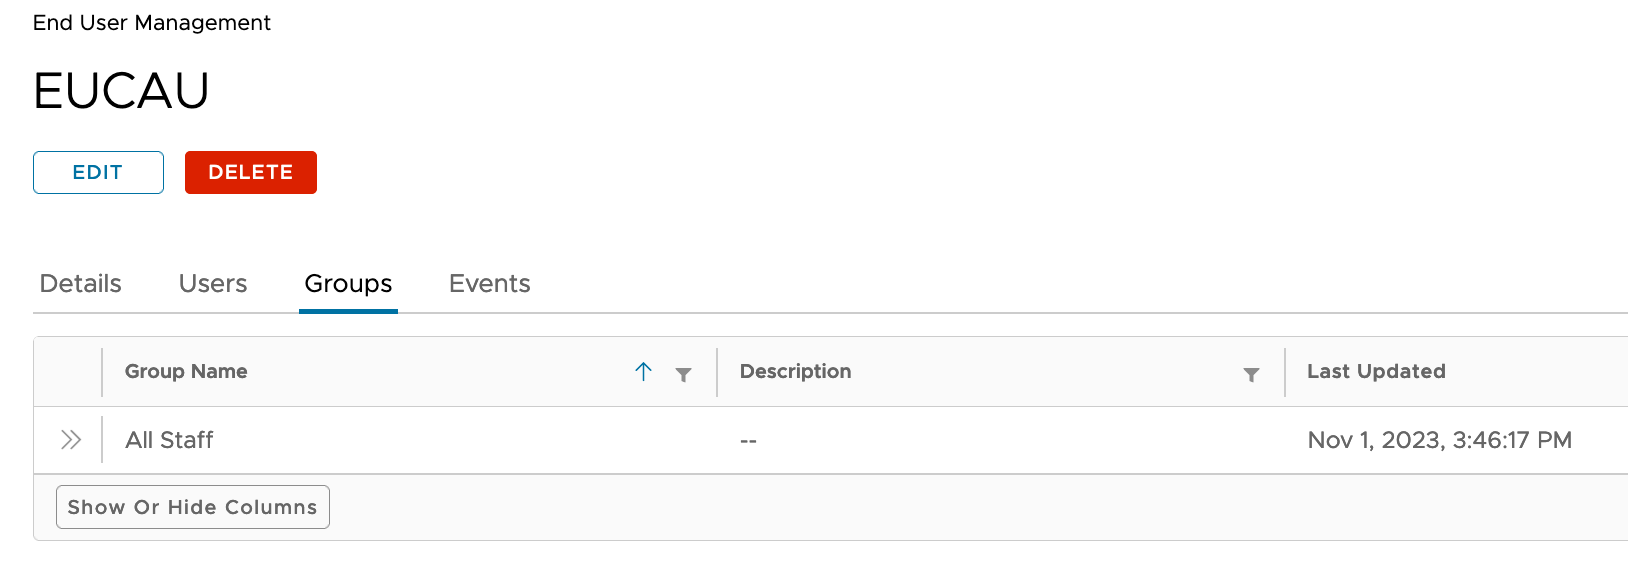
The group will now be shown within Omnissa Identity Services as shown:
The group and associated users will also be automatically synchronised too.
That’s it! You’ve now setup Omnissa Identity Services and it will automatically provision users and groups from Okta into both Workspace ONE UEM and Workspace ONE Access. You can test enrolling a device to ensure it’s working correctly.
If you have any feedback on Omnissa Identity Services, please let me know and I can pass this onto the product management team.
